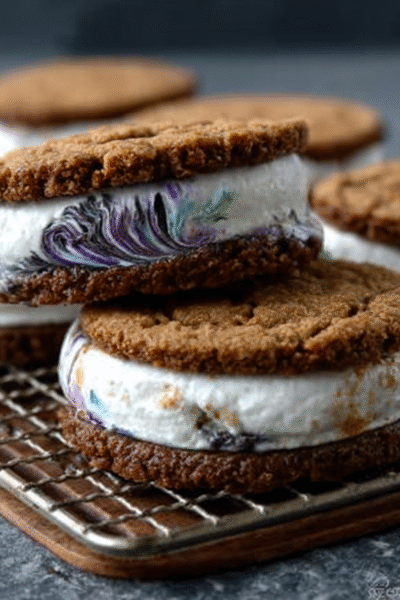
Birthday‑Cake Ice Cream Sandwich: Delightful Treats Await!

gutenberg
How to Make Birthday‑Cake Ice Cream Sandwich
Now that you’re all set with the ingredients, let’s dive into the fun part—making your very own Birthday‑Cake Ice Cream Sandwich! This is where the magic happens, and trust me, it’s easier than pie (or should I say cake?). Just follow these simple steps, and you’ll have a delightful treat ready to impress your family and friends.
Step 1 – Prep Ingredients
First things first, let’s get that oven preheating to 350°F (175°C). While that’s warming up, gather all your ingredients and necessary kitchen tools. You’ll need a large mixing bowl, a whisk (or an electric mixer if you’re feeling fancy), a greased baking pan, and a spatula. Oh, and don’t forget your ice cream scoop for the best part!
Step 2 – Begin Cooking
In your large bowl, mix together the birthday cake mix, vegetable oil, and eggs. I like to use a whisk for this part; it’s like a mini workout! Mix until everything is well combined and you see no dry cake mix left. The batter should be smooth and a little thick, just like a good cake batter should be.
Step 3 – Combine Ingredients
Now, it’s time to add some fun! Gently fold in the rainbow sprinkles. This is where the magic really starts to happen. The sprinkles add a pop of color and a hint of sweetness that makes this treat feel like a party. Once they’re mixed in, spread the batter evenly in your greased baking pan. Make sure it’s nice and even so that all your cake squares bake uniformly.
Step 4 – Finish and Serve
Pop that pan into the preheated oven and bake for 20-25 minutes. You’ll know it’s done when a toothpick inserted in the center comes out clean. While the cake is baking, take a moment to enjoy the delicious aroma wafting through your kitchen. It’s like a warm hug from the oven!
Once the cake is baked, let it cool completely. This is crucial because you don’t want to melt your ice cream when you assemble the sandwiches. Once cooled, cut the cake into squares. Now, here comes the fun part: take a scoop of vanilla ice cream and place it between two cake squares to form a sandwich. Top it off with a dollop of whipped cream and a sprinkle of extra sprinkles if you’re feeling extra festive!
Serve immediately for a delightful treat, or if you want to save some for later (which I highly recommend), pop them in the freezer. They’ll be waiting for you whenever you need a sweet pick-me-up!
Introduction to Birthday‑Cake Ice Cream Sandwich
Let me tell you, the Birthday‑Cake Ice Cream Sandwich is like a party in your mouth! Imagine the soft, fluffy goodness of birthday cake paired with creamy, dreamy ice cream, all wrapped up in a delightful sandwich. It’s the perfect treat for any celebration, whether it’s a birthday bash or just a Tuesday that needs a little sparkle.
As a busy woman myself, I know how precious time can be. Between juggling work, family, and everything in between, finding quick and enjoyable dessert options can feel like searching for a needle in a haystack. That’s why this recipe is a game-changer! It’s simple, fun, and sure to bring smiles to the faces of both kids and adults alike. So, let’s dive into this delicious adventure together!
Why You’ll Love This Birthday‑Cake Ice Cream Sandwich
Let’s be real—who doesn’t love a dessert that’s quick to whip up and even quicker to disappear? The Birthday‑Cake Ice Cream Sandwich is a breeze to prepare, taking just about 15 minutes of your time, plus a little baking. And cleanup? Minimal! Just a bowl and a pan, and you’re done.
This treat is a hit with everyone, from picky eaters to dessert connoisseurs. The sweet, nostalgic flavors of birthday cake and creamy vanilla ice cream are a universal favorite, making it perfect for family gatherings, casual get-togethers, or even a cozy night in. Plus, it’s not just for birthdays! You can serve these delightful sandwiches for any occasion—think summer barbecues, holiday parties, or just because it’s a Wednesday. Trust me, once you try it, you’ll be making these again and again!
Ingredients You’ll Need
Before we get our hands dirty, let’s gather all the ingredients for our Birthday‑Cake Ice Cream Sandwich. Here’s what you’ll need:
- 1 box of birthday cake mix: This is the star of the show! It provides the fluffy, sweet base for our sandwiches. You can use any brand you like, but I find that the classic yellow or funfetti mixes work best for that festive touch.
- 1/2 cup of vegetable oil: This adds moisture to the cake, making it soft and tender. If you want to elevate the flavor, feel free to swap this out for melted butter. It’ll give your cake a richer taste that’s simply divine!
- 3 large eggs: Eggs are essential for binding the ingredients together and adding structure to the cake. They also help it rise beautifully in the oven. If you’re looking for a lighter option, you can use egg substitutes or even applesauce—just keep in mind that the texture might vary a bit.
- 1/4 cup of rainbow sprinkles: These little gems are what make this cake feel like a celebration! They add color and a bit of crunch. You can use any type of sprinkles you like, but I recommend the classic jimmies for that nostalgic birthday cake vibe.
- 1 quart of vanilla ice cream: The creamy filling that takes this dessert to the next level! Vanilla is a classic choice, but don’t hesitate to get creative. Chocolate, strawberry, or even cookie dough ice cream can add a fun twist to your sandwiches.
- 1/2 cup of whipped cream: This is the cherry on top—literally! Whipped cream adds a light, fluffy texture that complements the cake and ice cream perfectly. You can use store-bought or whip up your own for a fresher taste.
Now, if you’re looking to make this treat a bit healthier, consider using low-sugar ice cream or a sugar-free cake mix. There are plenty of options out there that don’t skimp on flavor but cut back on the sugar. And remember, if you want to keep things simple, all the printable measurements are provided at the end of this article, so you can easily refer back to them while you’re in the kitchen!
How to Make Birthday‑Cake Ice Cream Sandwich
Now that you’re all set with the ingredients, let’s dive into the fun part—making your very own Birthday‑Cake Ice Cream Sandwich! This is where the magic happens, and trust me, it’s easier than pie (or should I say cake?). Just follow these simple steps, and you’ll have a delightful treat ready to impress your family and friends.
Step 1 – Prep Ingredients
First things first, let’s get that oven preheating to 350°F (175°C). While that’s warming up, gather all your ingredients and necessary kitchen tools. You’ll need a large mixing bowl, a whisk (or an electric mixer if you’re feeling fancy), a greased baking pan, and a spatula. Oh, and don’t forget your ice cream scoop for the best part!
Step 2 – Begin Cooking
In your large bowl, mix together the birthday cake mix, vegetable oil, and eggs. I like to use a whisk for this part; it’s like a mini workout! Mix until everything is well combined and you see no dry cake mix left. The batter should be smooth and a little thick, just like a good cake batter should be.
Step 3 – Combine Ingredients
Now, it’s time to add some fun! Gently fold in the rainbow sprinkles. This is where the magic really starts to happen. The sprinkles add a pop of color and a hint of sweetness that makes this treat feel like a party. Once they’re mixed in, spread the batter evenly in your greased baking pan. Make sure it’s nice and even so that all your cake squares bake uniformly.
Step 4 – Finish and Serve
Pop that pan into the preheated oven and bake for 20-25 minutes. You’ll know it’s done when a toothpick inserted in the center comes out clean. While the cake is baking, take a moment to enjoy the delicious aroma wafting through your kitchen. It’s like a warm hug from the oven!
Once the cake is baked, let it cool completely. This is crucial because you don’t want to melt your ice cream when you assemble the sandwiches. Once cooled, cut the cake into squares. Now, here comes the fun part: take a scoop of vanilla ice cream and place it between two cake squares to form a sandwich. Top it off with a dollop of whipped cream and a sprinkle of extra sprinkles if you’re feeling extra festive!
Serve immediately for a delightful treat, or if you want to save some for later (which I highly recommend), pop them in the freezer. They’ll be waiting for you whenever you need a sweet pick-me-up!

Tips for Perfect Results
- Use butter instead of vegetable oil: For a richer flavor that elevates your Birthday‑Cake Ice Cream Sandwich to gourmet status, swap out the vegetable oil for melted butter. It adds a delightful depth that your taste buds will thank you for!
- Customize with different ice cream flavors: Don’t be afraid to get creative! Whether your family loves chocolate, mint, or even cookie dough, feel free to mix and match ice cream flavors to suit everyone’s preferences. It’s all about making it your own!
- Make ahead of time: If you’re planning for a party or just want to have a sweet treat on hand, these sandwiches can be made ahead of time. Assemble them and store in the freezer for easy access whenever a craving strikes!
Essential Equipment Needed
Before we get started, let’s make sure you have all the right tools at your fingertips. Here’s a quick list of the essential equipment you’ll need to whip up your Birthday‑Cake Ice Cream Sandwich:
- Large mixing bowl: A must-have for combining all your ingredients. The bigger, the better—trust me, you don’t want batter splatters all over your kitchen!
- Baking pan: A standard 9×13 inch pan works perfectly for this recipe. Just make sure to grease it well so your cake comes out easily.
- Whisk or electric mixer: You can use a whisk for a little workout or an electric mixer for speed. Either way, you’ll want to mix until everything is well combined.
- Spatula: This handy tool is perfect for spreading the batter evenly in the pan and for assembling your ice cream sandwiches.
- Ice cream scoop: For the best results when adding ice cream to your sandwiches, an ice cream scoop is ideal. But if you don’t have one, a regular spoon will do just fine!
Delicious Variations of Birthday‑Cake Ice Cream Sandwich
Now that you’ve mastered the classic Birthday‑Cake Ice Cream Sandwich, let’s have some fun with variations! After all, variety is the spice of life, right? Here are some delightful twists that will keep your taste buds dancing and your family coming back for more.
- Use chocolate cake mix for a chocolate twist: If you or your family are chocolate lovers, why not swap out the birthday cake mix for a rich chocolate cake mix? The combination of chocolate cake and vanilla ice cream is a match made in dessert heaven. You can even add chocolate sprinkles for an extra touch of decadence!
- Substitute vanilla ice cream with strawberry or cookies and cream: Vanilla is classic, but don’t be afraid to switch it up! Strawberry ice cream adds a fruity freshness that pairs beautifully with the cake. Or, if you’re feeling adventurous, try cookies and cream ice cream for a delightful crunch in every bite. The possibilities are endless!
- Make it gluten-free by using a gluten-free cake mix: For those who need to avoid gluten, you can easily make this treat gluten-free. Just grab a gluten-free cake mix from your local grocery store, and you’re all set! Your friends and family won’t even notice the difference, and everyone can enjoy this delicious dessert together.
- Add crushed cookies or fruit between the layers for extra flavor: Want to take your Birthday‑Cake Ice Cream Sandwich to the next level? Consider adding crushed cookies, like Oreos or graham crackers, between the layers for a delightful crunch. Alternatively, fresh fruit like sliced strawberries or bananas can add a refreshing twist that balances the sweetness of the cake and ice cream.
These variations not only keep things exciting but also allow you to cater to different tastes and dietary needs. So, whether you’re celebrating a birthday or just treating yourself on a Tuesday, these twists on the classic Birthday‑Cake Ice Cream Sandwich will surely bring joy to your kitchen!
Serving Suggestions
Now that you’ve created your delightful Birthday‑Cake Ice Cream Sandwich, let’s talk about how to elevate the experience even further! Here are some fun serving suggestions that will make your treat even more enjoyable:
- Pair with fresh fruit: Serve your sandwiches alongside fresh strawberries or blueberries for a refreshing side. The natural sweetness and tartness of the fruit perfectly complement the rich flavors of the cake and ice cream.
- Serve with a glass of milk or a fun party punch: Nothing beats the classic combo of milk and cookies! A cold glass of milk is perfect for washing down your Birthday‑Cake Ice Cream Sandwich. Or, if you’re feeling festive, whip up a fun party punch to add a splash of color and excitement to your dessert table.
- Offer a variety of toppings: Set up a toppings bar with options like chocolate sauce, caramel, or even crushed nuts. Let everyone customize their sandwiches to their liking for an interactive and fun dessert experience!
These serving suggestions not only enhance the flavors but also add a touch of creativity to your dessert presentation. So, gather your family and friends, and enjoy these delightful treats together!
FAQs About Birthday‑Cake Ice Cream Sandwich
As you embark on your delightful journey of making Birthday‑Cake Ice Cream Sandwiches, you might have a few questions swirling in your mind. Don’t worry; I’ve got you covered! Here are some frequently asked questions that will help you navigate this sweet adventure with ease.
Can I make these sandwiches ahead of time?
Absolutely! One of the best things about these Birthday‑Cake Ice Cream Sandwiches is that they can be made in advance. Just assemble them and pop them in the freezer. They’ll be ready and waiting for you whenever a sweet craving strikes or when unexpected guests drop by. It’s like having a little stash of happiness at your fingertips!
What other flavors can I use?
Oh, the possibilities are endless! While the classic combination of birthday cake and vanilla ice cream is a crowd-pleaser, feel free to get creative. You can experiment with different cake mixes—chocolate, red velvet, or even lemon! And when it comes to ice cream, the sky’s the limit. Try strawberry, mint chocolate chip, or even a fun cookies and cream. Your family will love discovering new favorites!
How long do they last in the freezer?
These delightful sandwiches can be stored in the freezer for up to two weeks in an airtight container. Just make sure to separate layers with parchment paper to prevent them from sticking together. After all, you want to enjoy each bite without any fuss! But trust me, they’ll likely disappear long before that two-week mark!
So, whether you’re planning a birthday bash or just want to treat yourself, these FAQs should help you feel confident in your Birthday‑Cake Ice Cream Sandwich-making journey. Now, let’s get back to the fun of creating these delicious treats!

Final Thoughts on Birthday‑Cake Ice Cream Sandwich
As I wrap up this sweet adventure, I can’t help but smile at how easy and joyful making the Birthday‑Cake Ice Cream Sandwich truly is. It’s a delightful treat that brings a sprinkle of happiness to any occasion, whether it’s a birthday celebration or just a simple family gathering. With its delicious flavors and simple preparation, it’s perfect for busy lifestyles like ours!
I wholeheartedly encourage you to give this recipe a try for your next celebration. I promise it’ll be a hit with everyone, from the littlest ones to the young-at-heart. And hey, I’d love to hear about your experiences! Share your thoughts, variations, or any fun twists you come up with in the comments below. Let’s keep the joy of baking alive together!
“`
Print
Birthday‑Cake Ice Cream Sandwich: Delightful Treats Await!
- Total Time: 40 minutes
- Yield: 12 servings 1x
- Diet: Vegetarian
Description
A delightful and fun treat perfect for birthday celebrations, combining the flavors of cake and ice cream in a sandwich form.
Ingredients
- 1 box of birthday cake mix
- 1/2 cup of vegetable oil
- 3 large eggs
- 1/4 cup of rainbow sprinkles
- 1 quart of vanilla ice cream
- 1/2 cup of whipped cream
Instructions
- Preheat the oven to 350°F (175°C).
- In a large bowl, mix the birthday cake mix, vegetable oil, and eggs until well combined.
- Fold in the rainbow sprinkles.
- Spread the batter evenly in a greased baking pan.
- Bake for 20-25 minutes or until a toothpick comes out clean.
- Allow the cake to cool completely.
- Once cooled, cut the cake into squares.
- Place a scoop of vanilla ice cream between two cake squares to form a sandwich.
- Top with whipped cream and additional sprinkles if desired.
- Serve immediately or freeze for later enjoyment.
Notes
- For a richer flavor, use butter instead of vegetable oil.
- Feel free to customize with different ice cream flavors.
- These sandwiches can be made ahead of time and stored in the freezer.
- Prep Time: 15 minutes
- Cook Time: 25 minutes
- Category: Dessert
- Method: Baking
- Cuisine: American
Nutrition
- Serving Size: 1 sandwich
- Calories: 250
- Sugar: 18g
- Sodium: 150mg
- Fat: 10g
- Saturated Fat: 5g
- Unsaturated Fat: 3g
- Trans Fat: 0g
- Carbohydrates: 35g
- Fiber: 1g
- Protein: 3g
- Cholesterol: 30mg
Keywords: Birthday Cake, Ice Cream Sandwich, Dessert, Celebration