Pumpkin Oreo Balls: A Delicious Fall Treat You’ll Adore!

gutenberg
Why You’ll Love This Pumpkin Oreo Balls
Let me tell you, these Pumpkin Oreo Balls are not just another dessert; they’re a game-changer for busy women like us! If you’re juggling work, family, and a million other responsibilities, you’ll appreciate how quick and easy this recipe is. With just 20 minutes of prep time, you can whip up a batch of these delightful treats without breaking a sweat. Seriously, it’s like a little miracle in the kitchen!
One of the best parts? The cleanup is minimal. You won’t find yourself scrubbing pots and pans for hours. Just a mixing bowl, a baking sheet, and a microwave-safe bowl for melting chocolate. That’s it! I can’t tell you how many times I’ve avoided making a dessert because I dreaded the cleanup. But with these Pumpkin Oreo Balls, you can enjoy a sweet treat without the hassle.
Now, let’s talk about flavor. The combination of pumpkin and chocolate is simply irresistible. It’s like autumn wrapped in a bite-sized ball of joy! The creamy pumpkin puree mixed with the rich cream cheese and the crunch of Oreo cookies creates a flavor explosion that your family will adore. And trust me, even the pickiest eaters will be begging for more. I’ve seen my kids devour these like they’re candy, and I can’t blame them!
These little gems are perfect for any occasion. Whether you’re hosting a cozy gathering with friends, attending a potluck, or just want a sweet treat to enjoy while binge-watching your favorite show, Pumpkin Oreo Balls fit the bill. They’re festive enough for fall celebrations but simple enough for an everyday dessert. Plus, they’re no-bake, which means you can spend more time enjoying the company of your loved ones instead of slaving away in the kitchen.
And let’s not forget about the versatility! You can easily customize these Pumpkin Oreo Balls to suit your taste. Want to add a little spice? Toss in some cinnamon or nutmeg for that extra warmth. Prefer dark chocolate over white? Go for it! The possibilities are endless, and that’s what makes this recipe so special.
So, if you’re looking for a quick, delicious, and family-friendly dessert that captures the essence of fall, look no further than these Pumpkin Oreo Balls. They’re sure to become a staple in your dessert rotation, and you’ll love how easy they are to make. Trust me, once you try them, you’ll be hooked!
Introduction to Pumpkin Oreo Balls
Ah, fall! The season of cozy sweaters, colorful leaves, and, of course, all things pumpkin! If you’re like me, you can’t resist the warm, inviting flavors that come with this time of year. That’s where Pumpkin Oreo Balls come into play—a delightful treat that perfectly captures the essence of autumn in every bite.
Now, let’s be real for a moment. As busy women—whether you’re a mom juggling kids’ schedules, a professional racing against the clock, or just someone who loves to enjoy life—we often find ourselves short on time. The last thing we need is a complicated dessert recipe that requires hours in the kitchen. That’s why these Pumpkin Oreo Balls are a total lifesaver! With just a handful of ingredients and minimal prep time, you can whip up a batch of these delicious bites in no time.
Imagine this: you’ve had a long day, and the thought of making dessert feels like climbing a mountain. But with these little gems, you can have a sweet treat ready to go without the fuss. They’re no-bake, which means you can skip the oven and still impress your family and friends with a dessert that looks and tastes like you spent hours crafting it. Plus, they’re perfect for any occasion—be it a family gathering, a cozy night in, or even a last-minute potluck invite.
And let’s not forget the flavor combination! The rich, creamy pumpkin puree melds beautifully with the chocolatey goodness of crushed Oreo cookies, creating a taste sensation that’s simply irresistible. It’s like a hug in dessert form! The smooth cream cheese adds a delightful richness, making each bite a little piece of heaven. Trust me, once you take a bite, you’ll be hooked!
So, if you’re ready to embrace the flavors of fall and treat yourself (and your loved ones) to something special, let’s dive into the world of Pumpkin Oreo Balls. You won’t regret it!
Why You’ll Love This Pumpkin Oreo Balls
Let me tell you, these Pumpkin Oreo Balls are not just another dessert; they’re a game-changer for busy women like us! If you’re juggling work, family, and a million other responsibilities, you’ll appreciate how quick and easy this recipe is. With just 20 minutes of prep time, you can whip up a batch of these delightful treats without breaking a sweat. Seriously, it’s like a little miracle in the kitchen!
One of the best parts? The cleanup is minimal. You won’t find yourself scrubbing pots and pans for hours. Just a mixing bowl, a baking sheet, and a microwave-safe bowl for melting chocolate. That’s it! I can’t tell you how many times I’ve avoided making a dessert because I dreaded the cleanup. But with these Pumpkin Oreo Balls, you can enjoy a sweet treat without the hassle.
Now, let’s talk about flavor. The combination of pumpkin and chocolate is simply irresistible. It’s like autumn wrapped in a bite-sized ball of joy! The creamy pumpkin puree mixed with the rich cream cheese and the crunch of Oreo cookies creates a flavor explosion that your family will adore. And trust me, even the pickiest eaters will be begging for more. I’ve seen my kids devour these like they’re candy, and I can’t blame them!
These little gems are perfect for any occasion. Whether you’re hosting a cozy gathering with friends, attending a potluck, or just want a sweet treat to enjoy while binge-watching your favorite show, Pumpkin Oreo Balls fit the bill. They’re festive enough for fall celebrations but simple enough for an everyday dessert. Plus, they’re no-bake, which means you can spend more time enjoying the company of your loved ones instead of slaving away in the kitchen.
And let’s not forget about the versatility! You can easily customize these Pumpkin Oreo Balls to suit your taste. Want to add a little spice? Toss in some cinnamon or nutmeg for that extra warmth. Prefer dark chocolate over white? Go for it! The possibilities are endless, and that’s what makes this recipe so special.
So, if you’re looking for a quick, delicious, and family-friendly dessert that captures the essence of fall, look no further than these Pumpkin Oreo Balls. They’re sure to become a staple in your dessert rotation, and you’ll love how easy they are to make. Trust me, once you try them, you’ll be hooked!
Ingredients You’ll Need
Before we dive into the fun part of making these Pumpkin Oreo Balls, let’s gather our ingredients! Here’s what you’ll need:
- 1 package of Oreo cookies: The star of the show! These chocolatey cookies provide the perfect crunch and sweetness that pairs beautifully with pumpkin.
- 1 cup of pumpkin puree: This is where the fall flavor magic happens! Pumpkin puree adds moisture, a lovely texture, and that signature autumn taste we all adore.
- 8 oz cream cheese, softened: Cream cheese brings a rich, creamy element to the mix, making each bite melt in your mouth. It also helps bind everything together.
- 1 tsp vanilla extract: A splash of vanilla enhances the overall flavor, adding a warm, inviting aroma that makes these treats even more irresistible.
- 1 cup white chocolate chips: These are for coating the balls, giving them a sweet, creamy finish. Plus, they look so pretty when they’re all dipped and set!
Now, let’s talk about some optional substitutions and healthy swaps. If you’re looking to lighten things up a bit, you can use low-fat cream cheese instead of the regular kind. It’ll still give you that creamy texture without all the calories. And if you’re a fan of dark chocolate, feel free to swap out the white chocolate chips for dark chocolate chips. It adds a rich depth of flavor that pairs wonderfully with the pumpkin!
For those who might have dietary restrictions, you can also look for gluten-free Oreo cookies to make this treat suitable for everyone. It’s all about making these Pumpkin Oreo Balls work for you and your family!
And don’t worry about measuring everything out right now; I’ve got you covered! Printable measurements are provided at the end of the article, so you can easily reference them while you’re in the kitchen. Let’s get ready to create some deliciousness!
How to Make Pumpkin Oreo Balls
Alright, my fellow busy bees, it’s time to roll up our sleeves and get to the fun part—making these Pumpkin Oreo Balls! Trust me, this process is as easy as pie (or should I say, as easy as pumpkin spice?). Let’s break it down step by step so you can whip these up in no time!
Step 1 – Prep Ingredients
First things first, we need to crush those Oreo cookies into fine crumbs. You can do this in a couple of ways. If you have a food processor, just toss the cookies in and pulse until they’re a fine powder. It’s like magic! But if you don’t have one, no worries! Just place the Oreos in a zip-top bag, seal it tightly, and give them a good whack with a rolling pin. It’s a great way to relieve some stress, too! Just make sure you don’t go too hard, or you might end up with a bag full of crumbs and a few whole cookies. We want those crumbs to be nice and fine for the best texture in our Pumpkin Oreo Balls.
Step 2 – Begin Mixing
Now that we have our Oreo crumbs ready, it’s time to mix everything together. In a large mixing bowl, combine the crushed Oreos, 1 cup of pumpkin puree, 8 oz of softened cream cheese, and 1 teaspoon of vanilla extract. Grab a sturdy spatula or a wooden spoon and mix it all together until it’s well combined. You want to make sure that the cream cheese is fully incorporated, so there are no lumps. The mixture should be thick and slightly sticky, which is perfect for rolling into balls. If you’re feeling adventurous, you can even add a pinch of cinnamon or nutmeg at this stage for that extra fall flavor kick!
Step 3 – Combine Ingredients
Once everything is mixed, it’s time to form the mixture into small balls. I like to use a cookie scoop for this—it helps keep the size consistent, and it’s less messy! If you don’t have one, just use your hands to grab about a tablespoon of the mixture and roll it into a ball. Place each ball on a baking sheet lined with parchment paper. This step is crucial because it prevents the balls from sticking to the pan. Plus, it makes cleanup a breeze! Aim for about 24 balls, but if you end up with a few extra, I won’t tell anyone. They’re just too good to resist!
Step 4 – Finish and Serve
Now comes the waiting game! Pop the baking sheet with your formed balls into the refrigerator and let them chill for about 30 minutes. This helps them firm up, making them easier to dip in chocolate later. While they’re chilling, let’s melt those white chocolate chips. You can do this in a microwave-safe bowl. Just heat them in 30-second intervals, stirring in between until they’re smooth and melted. Be careful not to overheat them, or you’ll end up with a clumpy mess!
Once your Pumpkin Oreo Balls are chilled and the chocolate is melted, it’s time for the fun part—dipping! Using a fork, dip each ball into the melted white chocolate, making sure it’s fully coated. Let the excess chocolate drip off before placing it back on the parchment-lined baking sheet. If you want to get fancy, sprinkle some crushed Oreos on top before the chocolate sets. It adds a nice touch and makes them look extra special!
Finally, let the chocolate set completely before serving. You can pop them back in the fridge for a few minutes to speed up the process. And there you have it—your very own batch of delicious Pumpkin Oreo Balls, ready to be devoured! Trust me, once you take that first bite, you’ll be in fall dessert heaven!
Tips for Perfect Results
Now that you’re all set to make your Pumpkin Oreo Balls, let’s talk about some tips to ensure they turn out absolutely perfect! After all, we want these little bites of joy to be the star of your dessert table, right? Here are some actionable tips to elevate your Pumpkin Oreo Balls to the next level.
1. Enhance the Flavor: If you want to take the flavor of your Pumpkin Oreo Balls up a notch, consider adding some warm spices. A pinch of cinnamon or nutmeg can work wonders, giving your treats that cozy, fall vibe we all love. You could even experiment with a dash of ginger or allspice for a little extra kick. Just remember, a little goes a long way, so start small and adjust to your taste!
2. Speed Up Prep Time: We all know that time is of the essence, especially when you’re juggling a busy schedule. To speed up the prep process, use a food processor to crush the Oreo cookies. It’s quick, efficient, and you’ll have those crumbs ready in no time! If you don’t have a food processor, a zip-top bag and a rolling pin will do the trick, but the food processor is definitely the way to go if you want to save some time.
3. Keep Them Fresh: Once your Pumpkin Oreo Balls are made, you’ll want to keep them fresh for as long as possible. Store them in an airtight container in the refrigerator. They’ll stay delicious for up to a week, but trust me, they probably won’t last that long! If you want to make them ahead of time, you can also freeze them. Just make sure to layer them between parchment paper in a freezer-safe container. When you’re ready to enjoy, let them thaw in the fridge for a few hours before serving.
By following these simple tips, you’ll ensure that your Pumpkin Oreo Balls are not only delicious but also a breeze to make and store. So go ahead, get creative, and enjoy the process of making these delightful treats!
Essential Equipment Needed
Before we dive into making our Pumpkin Oreo Balls, let’s make sure we have all the necessary kitchen tools at our fingertips. Trust me, having the right equipment can make the process smoother and more enjoyable. Here’s what you’ll need:
- Mixing bowl: A large mixing bowl is essential for combining all those delicious ingredients. I recommend using one that’s big enough to give you some room to mix without making a mess. If you have a glass or ceramic bowl, it’s even better because you can see the beautiful colors of your mixture!
- Baking sheet: You’ll need a baking sheet to place your formed Pumpkin Oreo Balls on while they chill. A standard half-sheet pan works perfectly. If you don’t have one, any flat surface will do, but a baking sheet makes it easier to transport them in and out of the fridge.
- Parchment paper: This is a game-changer! Lining your baking sheet with parchment paper prevents the balls from sticking and makes cleanup a breeze. If you don’t have parchment paper, you can use wax paper, but be careful as it can sometimes stick to the chocolate.
- Microwave-safe bowl: You’ll need a bowl to melt your white chocolate chips. Make sure it’s labeled microwave-safe to avoid any kitchen disasters! If you don’t have a microwave-safe bowl, you can use a small saucepan on the stove to melt the chocolate over low heat.
Now, if you’re in a pinch and don’t have some of these tools, don’t worry! Here are a few practical alternatives:
- Zip-top bag: If you don’t have a food processor to crush the Oreos, simply place them in a zip-top bag, seal it tightly, and give them a good whack with a rolling pin or your hands. It’s a great way to relieve stress and get those cookies crushed!
- Fork or spoon: If you don’t have a cookie scoop for forming the balls, just use your hands or a spoon to grab the mixture and roll it into balls. It might get a little messy, but that’s part of the fun!
With these essential tools and a few handy alternatives, you’ll be all set to create your delicious Pumpkin Oreo Balls. Let’s get cooking!
Delicious Variations of Pumpkin Oreo Balls
Now that you’ve mastered the basic recipe for Pumpkin Oreo Balls, let’s have some fun with variations! The beauty of this treat is its versatility. You can easily tweak the flavors and ingredients to suit your taste or dietary needs. Here are some delicious ideas to get your creative juices flowing!
1. Spice It Up: If you want to add a little extra warmth to your Pumpkin Oreo Balls, consider incorporating a pinch of pumpkin spice into the mixture. This blend of cinnamon, nutmeg, and ginger will elevate the fall flavors and make each bite feel like a cozy hug. Just a little sprinkle can go a long way, so start small and adjust to your liking!
2. Chocolate Coating Options: While white chocolate is a classic choice for coating these treats, don’t be afraid to switch things up! Try using milk chocolate for a sweeter, creamier finish, or go for dark chocolate if you prefer a richer flavor. Dark chocolate pairs beautifully with the pumpkin and adds a touch of sophistication to your dessert. You could even get adventurous and mix different types of chocolate for a marbled effect!
3. Dietary Adjustments: If you or someone in your family has dietary restrictions, you can easily make these Pumpkin Oreo Balls work for you. For a gluten-free option, simply use gluten-free Oreo cookies. They’re widely available now, and you won’t sacrifice any flavor. Plus, it’s a great way to ensure everyone can enjoy these delightful treats!
4. Boost the Protein: Want to sneak in some extra nutrition? Consider adding a scoop of protein powder to the mixture. It’s a simple way to make these treats a bit more filling and satisfying, especially if you’re looking for a post-workout snack or a quick energy boost. Just be mindful of the flavor of the protein powder you choose; vanilla or unflavored works best to keep the pumpkin flavor front and center.
5. Add Some Crunch: If you love a bit of texture in your treats, try mixing in some chopped nuts or crushed pretzels into the mixture. This will give your Pumpkin Oreo Balls a delightful crunch that contrasts beautifully with the creamy filling. Just make sure to chop the nuts finely so they blend well with the other ingredients.
With these delicious variations, you can customize your Pumpkin Oreo Balls to fit any occasion or preference. Whether you’re hosting a fall gathering, looking for a fun family activity, or just want to treat yourself, these tweaks will keep things exciting and flavorful. So go ahead, get creative, and enjoy the process of making these delightful treats your own!
Serving Suggestions
Now that you’ve whipped up a batch of those delightful Pumpkin Oreo Balls, let’s talk about how to serve them up in style! After all, presentation can make a simple treat feel like a special occasion. Here are a couple of family-friendly pairing ideas that will elevate your dessert game and make your loved ones swoon!
1. Serve with a Warm Cup of Apple Cider: There’s something about the combination of pumpkin and apple that just screams fall, right? Imagine cozying up on a chilly evening with a warm cup of spiced apple cider in one hand and a Pumpkin Oreo Ball in the other. It’s like a hug in a mug! The sweet, tangy flavors of the cider perfectly complement the rich, creamy pumpkin treats. You can even add a cinnamon stick to your cider for that extra touch of warmth and aroma. Trust me, this pairing will have your family feeling all the cozy vibes!
2. Pair with Vanilla Ice Cream: If you’re looking to take your dessert to the next level, consider serving your Pumpkin Oreo Balls alongside a scoop of creamy vanilla ice cream. The cool, smooth texture of the ice cream contrasts beautifully with the rich, chocolatey coating of the balls. It’s a delightful combo that will have everyone coming back for seconds (or thirds!). You can even drizzle a little caramel sauce over the ice cream for an indulgent twist. Just picture it: a warm Pumpkin Oreo Ball melting in your mouth, followed by a cool scoop of ice cream. Pure bliss!
These serving suggestions are not only delicious but also super easy to pull together. Whether you’re hosting a fall gathering, enjoying a family movie night, or just treating yourself after a long day, these pairings will make your Pumpkin Oreo Balls shine even brighter. So go ahead, get creative, and enjoy the delightful flavors of fall with these simple yet satisfying combinations!
FAQs About Pumpkin Oreo Balls
As you embark on your delicious journey with Pumpkin Oreo Balls, you might have a few questions swirling around in your mind. Don’t worry; I’ve got you covered! Here are some frequently asked questions that will help you navigate this delightful recipe with ease.
What is the best way to store Pumpkin Oreo Balls?
To keep your Pumpkin Oreo Balls fresh and tasty, store them in an airtight container in the refrigerator. They’ll stay delicious for up to a week, but trust me, they probably won’t last that long! If you’re anything like me, you’ll find yourself sneaking a few every time you open the fridge. Just make sure to keep them sealed tight to maintain their flavor and texture.
Can I make these ahead of time?
Absolutely! One of the best things about these Pumpkin Oreo Balls is that they can be made a few days in advance. Just whip up a batch, let them chill, and store them in the fridge until you’re ready to serve. This makes them perfect for busy weeks or when you have a gathering coming up. You can even freeze them for longer storage—just remember to let them thaw in the fridge before serving. It’s a great way to have a sweet treat on hand whenever the craving strikes!
Are there any nut-free options for this recipe?
Yes, indeed! This recipe is naturally nut-free, which is fantastic for those with nut allergies. However, it’s always a good idea to double-check the ingredient labels, especially for the Oreo cookies and any other add-ins you might use. Some brands may have cross-contamination warnings, so it’s better to be safe than sorry. But rest assured, you can enjoy these Pumpkin Oreo Balls without worrying about nuts!
With these FAQs in mind, you’re all set to create your own batch of Pumpkin Oreo Balls. If you have any other questions or need further assistance, feel free to reach out. Happy baking!

Final Thoughts on Pumpkin Oreo Balls
As we wrap up our delightful journey into the world of Pumpkin Oreo Balls, I can’t help but reflect on just how easy and delicious these little treats are. Seriously, they’re like a warm hug on a chilly fall day, wrapped in chocolate and bursting with flavor! Whether you’re looking for a quick dessert to impress guests or a sweet treat to enjoy with your family, these Pumpkin Oreo Balls fit the bill perfectly.
What I love most about this recipe is its simplicity. With just a handful of ingredients and minimal prep time, you can create something that feels special without spending hours in the kitchen. It’s a win-win for busy women like us who want to enjoy the flavors of fall without the hassle. Plus, the no-bake aspect means you can whip them up even on the busiest of days—no oven required!
So, I encourage you to give these Pumpkin Oreo Balls a try. Gather your ingredients, roll up your sleeves, and dive into the fun of making these delightful treats. I promise you won’t regret it! The combination of creamy pumpkin, crunchy Oreos, and sweet chocolate is simply irresistible. And who knows? They might just become your new go-to dessert for every occasion!
As you savor each bite, take a moment to appreciate the flavors of fall and the joy of sharing something homemade with your loved ones. Whether you’re serving them at a gathering, enjoying them during a cozy night in, or simply treating yourself after a long day, these Pumpkin Oreo Balls are sure to bring smiles all around. Happy baking, and may your kitchen be filled with the delightful aroma of fall!
“`
Print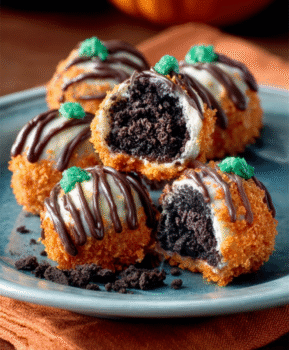
Pumpkin Oreo Balls: A Delicious Fall Treat You’ll Adore!
- Total Time: 50 minutes
- Yield: 24 balls 1x
- Diet: Vegetarian
Description
Pumpkin Oreo Balls are a delightful fall treat that combines the flavors of pumpkin and chocolate in a fun, bite-sized dessert.
Ingredients
- 1 package of Oreo cookies
- 1 cup of pumpkin puree
- 8 oz cream cheese, softened
- 1 tsp vanilla extract
- 1 cup white chocolate chips
Instructions
- Crush the Oreo cookies into fine crumbs.
- In a bowl, mix the crushed Oreos, pumpkin puree, cream cheese, and vanilla extract until well combined.
- Form the mixture into small balls and place them on a baking sheet lined with parchment paper.
- Chill the balls in the refrigerator for about 30 minutes.
- While the balls are chilling, melt the white chocolate chips in a microwave-safe bowl.
- Dip each chilled ball into the melted white chocolate, ensuring they are fully coated.
- Return the coated balls to the baking sheet and let them set until the chocolate hardens.
Notes
- For a festive touch, you can sprinkle some crushed Oreos on top of the chocolate before it sets.
- Store the Pumpkin Oreo Balls in an airtight container in the refrigerator for up to a week.
- Prep Time: 20 minutes
- Cook Time: 0 minutes
- Category: Dessert
- Method: No-Bake
- Cuisine: American
Nutrition
- Serving Size: 1 ball
- Calories: 120
- Sugar: 10g
- Sodium: 50mg
- Fat: 7g
- Saturated Fat: 4g
- Unsaturated Fat: 2g
- Trans Fat: 0g
- Carbohydrates: 15g
- Fiber: 1g
- Protein: 1g
- Cholesterol: 15mg
Keywords: Pumpkin Oreo Balls, fall dessert, no-bake treats
