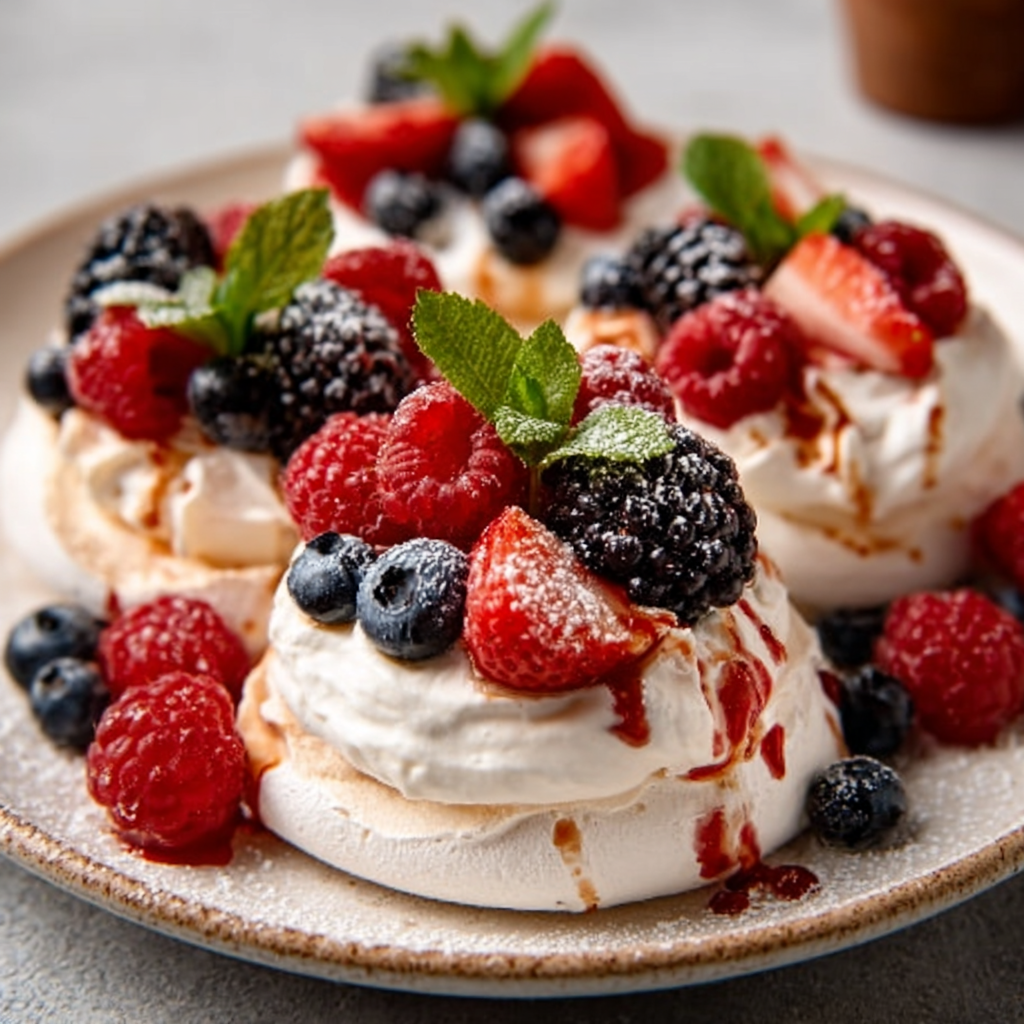
Mini Berry Pavlovas are a delightful dessert you must try!
gutenberg
Why You’ll Love This Mini Berry Pavlovas
Let me tell you, if you’re a busy woman juggling work, family, and everything in between, Mini Berry Pavlovas are about to become your new best friend in the kitchen! These little clouds of sweetness are not just a treat for the taste buds; they’re a lifesaver when you need a quick, impressive dessert that doesn’t require hours of slaving away in the kitchen.
First off, the preparation time is a breeze. With just 20 minutes of hands-on work, you can whip up these delightful pavlovas. And the best part? While they’re baking, you can kick back and relax, or tackle that ever-growing pile of laundry. Seriously, it’s like having your cake and eating it too—without the guilt of spending all day in the kitchen!
Now, let’s talk about cleanup. I don’t know about you, but after a long day, the last thing I want to do is scrub pots and pans. The beauty of these Mini Berry Pavlovas is that they require minimal equipment. Just a mixing bowl, a whisk, and a baking sheet lined with parchment paper. Easy peasy! You’ll be in and out of the kitchen in no time, leaving you with more precious moments to spend with your loved ones.
And let’s not forget about the flavors! These pavlovas are a hit with both adults and kids alike. The light, airy meringue pairs perfectly with the rich whipped cream and the burst of freshness from the mixed berries. It’s like a party in your mouth! Plus, you can customize the toppings to suit your family’s preferences. If your kids are more into chocolate, toss in some cocoa powder for a delightful twist. Or if you’re feeling tropical, swap the berries for mango and kiwi. The possibilities are endless!
Imagine serving these stunning little desserts at your next family gathering or dinner party. Your guests will be raving about how you pulled off such a fancy dessert with seemingly little effort. You’ll be the star of the show, and trust me, no one needs to know how easy it was to make them!
So, whether you’re looking to impress at a potluck, celebrate a special occasion, or simply treat yourself after a long week, Mini Berry Pavlovas are the perfect solution. They’re light, they’re delicious, and they fit seamlessly into your busy lifestyle. What’s not to love?
Introduction to Mini Berry Pavlovas
Welcome to the world of Mini Berry Pavlovas—a dessert that’s as delightful as it is easy to make! If you’re like me, a busy woman navigating the whirlwind of life, you know how precious time can be. Between work, family commitments, and the never-ending to-do list, finding time to whip up a fancy dessert can feel like an impossible task. But fear not! These little meringue wonders are here to save the day.
Picture this: a light, airy meringue that practically melts in your mouth, topped with luscious whipped cream and a medley of vibrant berries. It’s like a little piece of heaven on a plate! The beauty of Mini Berry Pavlovas lies not only in their taste but also in their simplicity. They’re perfect for any occasion—be it a casual family dinner, a festive gathering, or even a cozy night in with a good book. Trust me, once you try them, you’ll wonder how you ever lived without them!
What I love most about these pavlovas is their versatility. You can dress them up or down, depending on your mood or the occasion. Want to impress your friends at a brunch? Top them with a colorful array of berries and a sprig of mint for that extra flair. Craving something sweet after a long day? Just grab a pavlova, and you’ll feel like you’re indulging in a gourmet treat without the fuss. It’s like having a little celebration in your mouth, no matter the day!
So, if you’re ready to elevate your dessert game without spending hours in the kitchen, let’s dive into the delightful world of Mini Berry Pavlovas. I promise you, these little beauties will become a staple in your dessert repertoire, bringing joy and sweetness to your busy life!
Why You’ll Love This Mini Berry Pavlovas
Let me tell you, if you’re a busy woman juggling work, family, and everything in between, Mini Berry Pavlovas are about to become your new best friend in the kitchen! These little clouds of sweetness are not just a treat for the taste buds; they’re a lifesaver when you need a quick, impressive dessert that doesn’t require hours of slaving away in the kitchen.
First off, the preparation time is a breeze. With just 20 minutes of hands-on work, you can whip up these delightful pavlovas. And the best part? While they’re baking, you can kick back and relax, or tackle that ever-growing pile of laundry. Seriously, it’s like having your cake and eating it too—without the guilt of spending all day in the kitchen!
Now, let’s talk about cleanup. I don’t know about you, but after a long day, the last thing I want to do is scrub pots and pans. The beauty of these Mini Berry Pavlovas is that they require minimal equipment. Just a mixing bowl, a whisk, and a baking sheet lined with parchment paper. Easy peasy! You’ll be in and out of the kitchen in no time, leaving you with more precious moments to spend with your loved ones.
And let’s not forget about the flavors! These pavlovas are a hit with both adults and kids alike. The light, airy meringue pairs perfectly with the rich whipped cream and the burst of freshness from the mixed berries. It’s like a party in your mouth! Plus, you can customize the toppings to suit your family’s preferences. If your kids are more into chocolate, toss in some cocoa powder for a delightful twist. Or if you’re feeling tropical, swap the berries for mango and kiwi. The possibilities are endless!
Imagine serving these stunning little desserts at your next family gathering or dinner party. Your guests will be raving about how you pulled off such a fancy dessert with seemingly little effort. You’ll be the star of the show, and trust me, no one needs to know how easy it was to make them!
So, whether you’re looking to impress at a potluck, celebrate a special occasion, or simply treat yourself after a long week, Mini Berry Pavlovas are the perfect solution. They’re light, they’re delicious, and they fit seamlessly into your busy lifestyle. What’s not to love?
Ingredients You’ll Need
Before we dive into the delightful world of Mini Berry Pavlovas, let’s gather our ingredients! This is where the magic begins, and I promise, it’s as simple as pie—well, maybe even simpler! Here’s what you’ll need:
- 2 large egg whites: The star of our pavlovas! Egg whites are whipped to create that airy, cloud-like texture we all love. Make sure they’re at room temperature for the best results.
- 1/4 teaspoon cream of tartar: This little gem helps stabilize the egg whites, ensuring they whip up to those glorious stiff peaks. If you don’t have cream of tartar, you can substitute it with a splash of lemon juice or white vinegar.
- 1/2 cup granulated sugar: Sweetness is key! This sugar not only sweetens the meringue but also helps create that lovely glossy finish. If you’re looking for a healthier option, you can use coconut sugar, but keep in mind it may alter the color slightly.
- 1/2 teaspoon vanilla extract: A splash of vanilla adds warmth and depth to the flavor. Feel free to experiment with other extracts like almond or even a hint of orange zest for a unique twist!
- 1 teaspoon cornstarch: This ingredient helps give the pavlovas a soft, marshmallow-like center. If you’re looking for a gluten-free option, cornstarch is perfect, but you can also use arrowroot powder as a substitute.
- 1/2 cup heavy whipping cream: This is what makes our pavlovas indulgent! Whipping cream adds richness and a creamy texture. If you want a lighter version, you can use half-and-half, but the creaminess will be less pronounced.
- 1 tablespoon powdered sugar: A little sweetness for the whipped cream! It helps stabilize the cream and gives it that lovely, sweet flavor. You can skip this if you prefer unsweetened whipped cream.
- 1 teaspoon vanilla extract: Yes, we’re using it again! This time, it’s for the whipped cream. It’s all about layering those flavors, my friends!
- 1 cup mixed berries (strawberries, blueberries, raspberries): The colorful crown jewels of our pavlovas! Feel free to mix and match your favorite berries. If you’re feeling adventurous, try adding some sliced kiwi or mango for a tropical flair!
- Fresh mint leaves for garnish (optional): A sprig of mint adds a pop of color and a refreshing touch. Plus, it makes your pavlovas look extra fancy!
And there you have it! A simple yet delightful list of ingredients that will come together to create your Mini Berry Pavlovas. Don’t worry if you don’t have everything on hand; cooking is all about improvisation! Just remember, the key to a great pavlova is in the egg whites and the love you put into it.
For your convenience, I’ve provided printable measurements at the end of this article. So, let’s get ready to whip up some magic in the kitchen!
How to Make Mini Berry Pavlovas
Alright, my fellow busy women, it’s time to roll up our sleeves and dive into the delightful process of making Mini Berry Pavlovas. Trust me, this is where the fun begins! With just a few simple steps, you’ll have these gorgeous little desserts ready to impress. Let’s get started!
Step 1 – Prep Ingredients
First things first, let’s get our kitchen ready for some meringue magic! Preheat your oven to a cozy 225°F (110°C). This low temperature is key to achieving that perfect, crispy exterior while keeping the inside soft and marshmallowy.
While the oven warms up, grab a baking sheet and line it with parchment paper. This will prevent our pavlovas from sticking and make cleanup a breeze. Now, gather all your ingredients and measure them out. Having everything ready to go will make the process smoother and more enjoyable. Plus, it’s a great way to feel like a pro chef, even if you’re just whipping up dessert for the family!
Step 2 – Begin Cooking
Now, let’s get to the fun part—whipping those egg whites! In a clean, dry mixing bowl, add your 2 large egg whites and 1/4 teaspoon of cream of tartar. Using an electric mixer, beat them on medium speed until soft peaks start to form. This is where the magic happens, and you’ll see those egg whites transform into a fluffy cloud!
Once you’ve got those soft peaks, it’s time to sweeten the deal. Gradually add in your 1/2 cup of granulated sugar, one tablespoon at a time. Keep beating on high speed until the mixture becomes glossy and forms stiff peaks. This should take about 5-7 minutes. You’ll know it’s ready when you can turn the bowl upside down without the meringue budging an inch—now that’s a solid meringue!
Step 3 – Combine Ingredients
With our meringue ready, it’s time to add a touch of flavor! Gently fold in 1/2 teaspoon of vanilla extract and 1 teaspoon of cornstarch using a spatula. Be careful not to deflate the meringue; we want to keep all that lovely air we just whipped in! Just a few gentle folds until everything is combined will do the trick.
Step 4 – Finish and Serve
Now comes the fun part—shaping our pavlovas! Using a spoon or a piping bag, dollop or pipe the meringue mixture onto the prepared baking sheet. Aim for small rounds about 3 inches in diameter, and don’t forget to create a slight indentation in the center for the whipped cream and berries later. They should look like little nests waiting to be filled!
Pop those beauties into the preheated oven and let them bake for 1 hour. After that, turn off the oven and leave the pavlovas inside to cool completely for at least 1 hour. This step is crucial for achieving that perfect texture—crispy on the outside and soft on the inside.
While the pavlovas are cooling, let’s whip up some cream! In a separate bowl, beat 1/2 cup of heavy whipping cream with 1 tablespoon of powdered sugar and 1 teaspoon of vanilla extract until soft peaks form. This creamy goodness will be the perfect topping for our pavlovas.
Once the pavlovas are completely cool, carefully remove them from the parchment paper. Now, it’s time to assemble! Spoon the whipped cream into the center of each pavlova and top with a generous handful of mixed berries. If you’re feeling fancy, add a sprig of fresh mint for that extra pop of color and flavor.
And there you have it—your very own Mini Berry Pavlovas! These little delights are not only a feast for the eyes but also a treat for the taste buds. Enjoy every bite, and don’t forget to share with your loved ones (or keep them all to yourself—no judgment here!).

Tips for Perfect Results
Now that you’re on your way to creating the most delightful Mini Berry Pavlovas, let’s talk about a few tips that will help you achieve perfect results every time. Trust me, these little nuggets of wisdom can make all the difference!
First up, let’s chat about egg whites. For the best volume and texture, make sure your egg whites are at room temperature before you start whipping. Cold egg whites can be a bit stubborn and won’t whip up as nicely. So, if you have time, take them out of the fridge about 30 minutes before you begin. It’s a small step that pays off big time!
Next, let’s ensure we keep things clean and yolk-free. When separating your egg whites, be super careful not to let any yolk mix in. Even a tiny bit of yolk can prevent the whites from whipping up to their full potential. If you’re like me and have a bit of a shaky hand, consider using an egg separator or cracking the eggs into a small bowl first, then transferring the whites to your mixing bowl. It’s a foolproof way to keep things tidy!
Finally, once your Mini Berry Pavlovas are baked and cooled, you’ll want to store them properly to maintain that delightful crispness. Place them in an airtight container at room temperature. Avoid refrigerating them, as the moisture can make them soggy. If you have any leftovers (which is rare, but it happens!), this will help keep them fresh and ready for your next sweet craving.
With these tips in your back pocket, you’re all set to create pavlovas that are not only beautiful but also deliciously perfect. Happy baking!
Essential Equipment Needed
Before we dive into the delightful process of making Mini Berry Pavlovas, let’s take a moment to gather our essential kitchen tools. Having the right equipment on hand will make your baking experience smoother and more enjoyable. Trust me, you don’t want to be scrambling around looking for a whisk when you’re in the middle of whipping up those egg whites!
- Electric mixer: This is your best friend when it comes to whipping egg whites into fluffy perfection. A hand mixer works just fine, but if you have a stand mixer, even better! It allows you to multitask while the mixer does all the hard work.
- Mixing bowls: You’ll need a couple of these—one for the meringue and another for whipping the cream. Opt for glass or stainless steel bowls, as they’re easier to clean and won’t retain any odors.
- Parchment paper: This is a must-have for lining your baking sheet. It prevents the pavlovas from sticking and makes cleanup a breeze. Plus, it gives your pavlovas a nice, clean look when you serve them!
- Baking sheet: A standard baking sheet will do the trick. Make sure it’s large enough to hold all your pavlovas without crowding them. You want them to have enough space to bake evenly and rise beautifully.
- Spatula: A rubber spatula is perfect for gently folding in the vanilla and cornstarch into the meringue. It’s also handy for transferring the whipped cream onto the pavlovas without making a mess.
- Whisk: While the electric mixer is great for whipping egg whites, a whisk is essential for mixing the whipped cream. It gives you a bit more control, allowing you to achieve that perfect soft peak consistency.
With these essential tools at your disposal, you’re all set to create the most delightful Mini Berry Pavlovas. Remember, having the right equipment not only makes the process easier but also adds to the joy of baking. So, let’s get ready to whip up some magic in the kitchen!
Delicious Variations of Mini Berry Pavlovas
Now that you’ve mastered the classic Mini Berry Pavlovas, let’s have some fun with variations! The beauty of this dessert is its versatility. You can easily switch things up to suit your mood or the season. Here are a few delightful twists that will keep your taste buds dancing and impress your family and friends!
First up, let’s talk about a chocolate twist. If you’re a chocolate lover like me, you’ll want to try adding 1 tablespoon of cocoa powder to the meringue mixture. This simple addition transforms your pavlovas into a rich, chocolatey delight that’s perfect for satisfying those sweet cravings. Just imagine biting into a light, airy chocolate meringue topped with whipped cream and berries—it’s like a dream come true! You can even sprinkle some chocolate shavings on top for an extra touch of decadence.
Next, let’s take a trip to the tropics! For a refreshing change, swap out the mixed berries for tropical fruits like mango and kiwi. The sweet, juicy mango pairs beautifully with the creamy whipped topping, while the tartness of kiwi adds a delightful zing. This combination is not only visually stunning but also brings a burst of sunshine to your dessert table. It’s like a mini vacation on a plate, and who doesn’t need that every now and then?
Feeling adventurous? Why not experiment with flavored extracts? Instead of the usual vanilla, try using almond or coconut extract for a unique twist. Almond extract adds a lovely nutty flavor that complements the sweetness of the pavlova, while coconut extract brings a tropical vibe that pairs perfectly with any fruit topping. Just a teaspoon will do the trick, and you’ll be amazed at how a small change can elevate your dessert to new heights!
And don’t forget, you can mix and match these variations! A chocolate pavlova topped with tropical fruits and a hint of coconut extract? Yes, please! The possibilities are endless, and that’s what makes Mini Berry Pavlovas so much fun to make. So, get creative in the kitchen and let your imagination run wild. Your taste buds will thank you!
With these delicious variations, you’ll never get bored of making Mini Berry Pavlovas. Whether you’re hosting a gathering or just treating yourself, these twists will keep your dessert game fresh and exciting. So, roll up your sleeves and let’s get experimenting!
Serving Suggestions
Now that you’ve created your stunning Mini Berry Pavlovas, let’s talk about how to serve them up for maximum enjoyment! Presentation is key, and pairing these delightful desserts with the right accompaniments can elevate your dessert experience to a whole new level.
First up, consider pairing your pavlovas with a light fruit salad. A simple mix of seasonal fruits like melons, oranges, and grapes can add a refreshing contrast to the sweetness of the pavlovas. The juicy, vibrant fruits will not only complement the flavors of the berries but also add a splash of color to your dessert table. Plus, it’s a great way to sneak in some extra vitamins and nutrients!
If you’re looking for something a bit more indulgent, why not serve your pavlovas with a scoop of sorbet? A tangy lemon or raspberry sorbet can provide a delightful contrast to the creamy whipped topping and the sweet meringue. The cold, refreshing sorbet will cleanse your palate and leave you feeling satisfied without being overly full. It’s like a mini dessert buffet on your plate!
Now, let’s talk about drinks! To keep things light and refreshing, I highly recommend serving your Mini Berry Pavlovas alongside a cup of herbal tea. A soothing chamomile or a zesty peppermint tea can enhance the overall experience, making it feel like a cozy afternoon treat. The warmth of the tea pairs beautifully with the coolness of the pavlovas, creating a delightful balance.
If tea isn’t your thing, consider offering sparkling water with a twist of lemon or lime. The effervescence of the sparkling water adds a celebratory touch to your dessert, making it feel extra special. Plus, it’s a great way to stay hydrated while indulging in something sweet!
And there you have it—some simple yet effective serving suggestions to elevate your Mini Berry Pavlovas experience. Whether you choose to keep it light with a fruit salad or indulge with sorbet, these pairings will surely impress your family and friends. So, gather around the table, serve up those pavlovas, and enjoy every delightful bite!
FAQs About Mini Berry Pavlovas
As you embark on your delightful journey of making Mini Berry Pavlovas, you might have a few questions swirling around in your mind. Don’t worry; I’ve got you covered! Here are some frequently asked questions that will help you navigate the world of pavlovas with ease.
Can I make Mini Berry Pavlovas ahead of time?
Absolutely! One of the best things about Mini Berry Pavlovas is that they can be made a day in advance. Just whip up the meringue, bake them, and let them cool completely. Once they’re cool, store them in an airtight container at room temperature. This way, you can have a stress-free dessert ready to go for your next gathering or family dinner. Just add the whipped cream and berries right before serving for that fresh touch!
What can I use instead of heavy cream?
If you’re looking for a dairy-free option, you can easily substitute heavy cream with coconut cream. Just chill a can of full-fat coconut milk overnight, then scoop out the solid cream that forms at the top. Whip it up just like you would with heavy cream, and you’ll have a deliciously creamy topping for your pavlovas. It adds a lovely tropical flavor that pairs beautifully with the berries!
How do I store leftover pavlovas?
Leftover pavlovas? What a rare treat! If you happen to have any pavlovas left after your dessert extravaganza, store them in an airtight container at room temperature. They’ll stay fresh for up to 2 days. Just keep in mind that the longer they sit, the more they may lose their crispiness. But hey, even a slightly softened pavlova is still a delightful treat!
With these FAQs in your back pocket, you’re all set to tackle any questions that may arise while making your Mini Berry Pavlovas. Enjoy the process, and remember, baking is all about having fun and creating delicious memories!

Final Thoughts on Mini Berry Pavlovas
As we wrap up our delightful journey into the world of Mini Berry Pavlovas, I can’t help but reflect on just how easy and delicious these little treats are. Seriously, if you’re looking for a dessert that feels fancy but doesn’t require a culinary degree, you’ve hit the jackpot! These pavlovas are like little clouds of joy, and they come together with such minimal effort that you’ll wonder why you didn’t make them sooner.
What I love most about Mini Berry Pavlovas is their versatility. Whether you’re hosting a dinner party, celebrating a special occasion, or just treating yourself after a long week, these pavlovas fit seamlessly into any scenario. They’re light enough to enjoy after a hearty meal, yet indulgent enough to satisfy your sweet tooth. Plus, the vibrant colors of the berries make them a feast for the eyes, too!
So, if you’re a busy woman like me, juggling work, family, and everything in between, I wholeheartedly encourage you to give this recipe a try. You’ll be amazed at how quickly you can whip up these delightful desserts, and your family will be singing your praises. Imagine their faces when you present these stunning pavlovas at the dinner table—trust me, it’s a moment worth capturing!
And remember, cooking should be fun and enjoyable, not a chore. With Mini Berry Pavlovas, you can create something beautiful and delicious without spending hours in the kitchen. So, roll up your sleeves, gather your ingredients, and let’s make some magic happen! I can’t wait for you to experience the joy of these pavlovas in your own home. Happy baking!
“`
Print
Mini Berry Pavlovas are a delightful dessert you must try!
- Total Time: 2 hours 20 minutes
- Yield: 4 servings 1x
- Diet: Vegetarian
Description
Mini Berry Pavlovas are a delightful dessert you must try!
Ingredients
- 2 large egg whites
- 1/4 teaspoon cream of tartar
- 1/2 cup granulated sugar
- 1/2 teaspoon vanilla extract
- 1 teaspoon cornstarch
- 1/2 cup heavy whipping cream
- 1 tablespoon powdered sugar
- 1 teaspoon vanilla extract
- 1 cup mixed berries (strawberries, blueberries, raspberries)
- Fresh mint leaves for garnish (optional)
Instructions
- Preheat the oven to 225°F (110°C) and line a baking sheet with parchment paper.
- In a clean, dry mixing bowl, beat the egg whites and cream of tartar with an electric mixer on medium speed until soft peaks form.
- Gradually add the granulated sugar, one tablespoon at a time, while continuing to beat on high speed until the mixture is glossy and stiff peaks form. This should take about 5-7 minutes.
- Gently fold in the vanilla extract and cornstarch using a spatula until just combined.
- Spoon or pipe the meringue mixture onto the prepared baking sheet, creating small rounds about 3 inches in diameter with a slight indentation in the center.
- Bake in the preheated oven for 1 hour, then turn off the oven and leave the pavlovas inside to cool completely for at least 1 hour.
- While the pavlovas are cooling, whip the heavy cream with the powdered sugar and vanilla extract until soft peaks form.
- Once the pavlovas are completely cool, carefully remove them from the parchment paper.
- Spoon the whipped cream into the center of each pavlova and top with mixed berries. Garnish with fresh mint leaves if desired.
Notes
- For a chocolate twist, add 1 tablespoon of cocoa powder to the meringue mixture.
- For a tropical variation, use mango and kiwi as toppings instead of berries.
- Prep Time: 20 minutes
- Cook Time: 1 hour
- Category: Dessert
- Method: Baking
- Cuisine: Australian
Nutrition
- Serving Size: 1 pavlova
- Calories: 180
- Sugar: 10g
- Sodium: 30mg
- Fat: 12g
- Saturated Fat: 7g
- Unsaturated Fat: 3g
- Trans Fat: 0g
- Carbohydrates: 15g
- Fiber: 1g
- Protein: 3g
- Cholesterol: 40mg
Keywords: Mini Berry Pavlovas
