Whipped Ricotta & Hot Honey Crostini Clouds: A Must-Try!
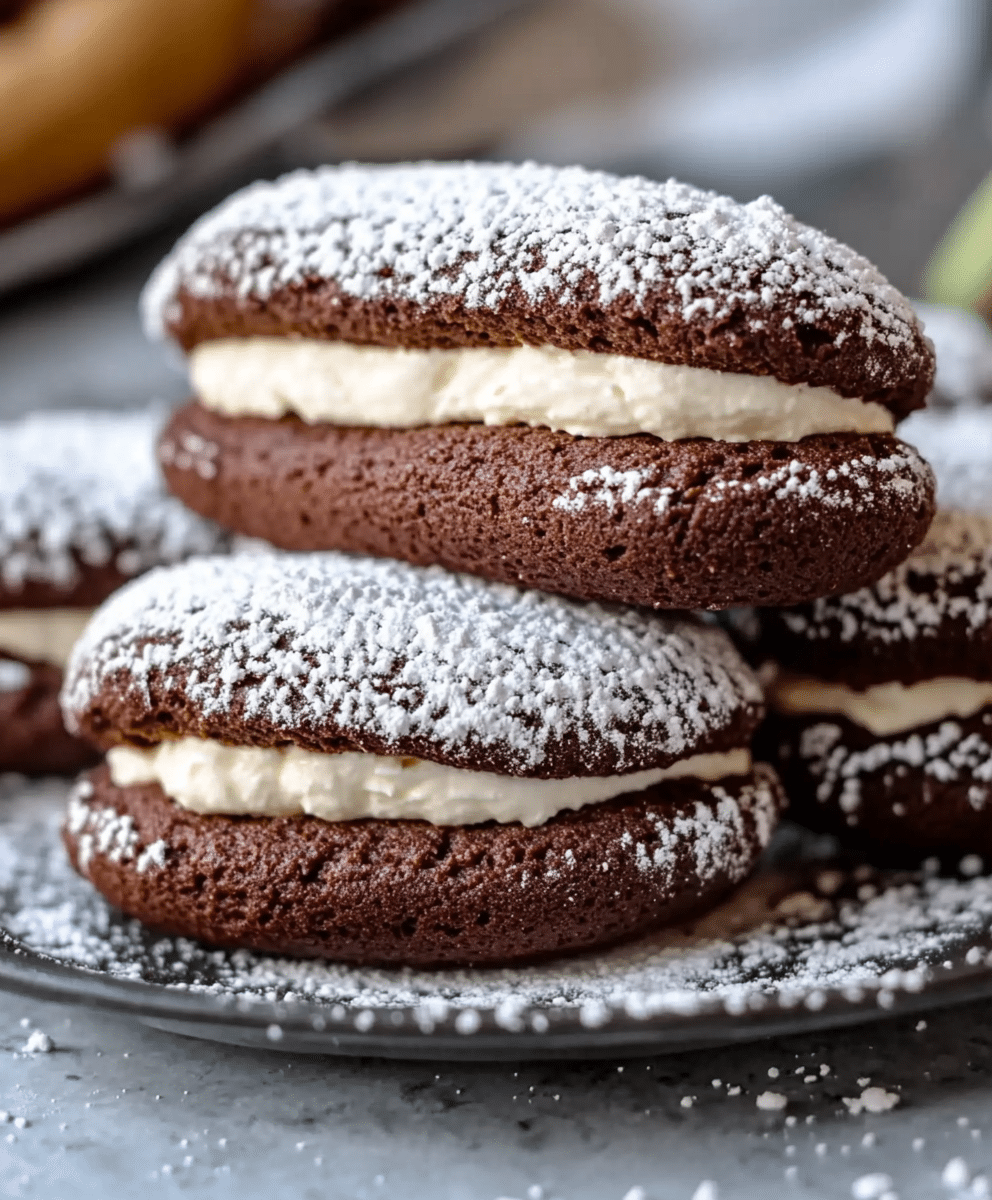
Introduction to Homemade Devil Dogs
Ah, the joy of biting into a soft, chocolatey treat that feels like a warm hug on a hectic day! Let me introduce you to Homemade Devil Dogs, a delightful, keto-friendly dessert that’s as easy to make as it is to devour. If you’re anything like me, juggling work, family, and the occasional me-time, you’ll appreciate a recipe that doesn’t demand hours in the kitchen. These devil dogs are perfect for busy American women, especially moms and working professionals, who crave a quick and satisfying treat without the guilt.
Why You’ll Love This Homemade Devil Dogs
Picture this: a dessert that takes less time to prepare than your favorite TV show episode and leaves you with minimal cleanup. That’s the magic of Homemade Devil Dogs! With family-friendly flavors and keto-friendly ingredients, these treats are a win-win. Whether you’re dealing with picky eaters or just need a sweet escape, these devil dogs have got you covered. Plus, they’re a fantastic way to sneak in a little indulgence while sticking to your dietary goals.
Ingredients You’ll Need
- 1 ½ cups almond flour
- ½ cup unsweetened cocoa powder
- 1 teaspoon baking powder
- ½ teaspoon baking soda
- ½ teaspoon salt
- ½ cup erythritol or your preferred keto sweetener
- 3 large eggs
- ½ cup unsweetened almond milk
- 1 teaspoon vanilla extract
- ½ cup unsweetened coconut cream (for filling)
- 1 tablespoon powdered erythritol (for filling)
- ½ teaspoon vanilla extract (for filling)
Now, let’s talk about flexibility. You can easily swap out the erythritol for another keto sweetener you prefer. And if you’re feeling adventurous, a pinch of cinnamon in the batter or a few drops of peppermint extract in the filling can elevate these devil dogs to a whole new level. Remember, printable measurements are provided at the article’s end, so you can keep this recipe handy for whenever the craving strikes.
How to Make Homemade Devil Dogs
Step 1 – Prep Ingredients
First things first, preheat your oven to 350°F (175°C) and line a baking sheet with parchment paper. This little step ensures your devil dogs come out perfectly every time. In a large bowl, mix together the almond flour, cocoa powder, baking powder, baking soda, salt, and erythritol. Make sure there are no clumps—nobody wants a surprise bite of baking soda!
Step 2 – Begin Cooking
In another bowl, whisk together the eggs, almond milk, and vanilla extract until smooth. This is where the magic begins. Pour the wet ingredients into the dry ingredients and mix until you have a thick, luscious batter. It might take a little elbow grease, but trust me, it’s worth it.
Step 3 – Combine Ingredients
Using a spoon or a cookie scoop, drop heaping tablespoons of batter onto the prepared baking sheet, spacing them about 2 inches apart. Pop them in the oven and bake for 10-12 minutes, or until the tops are set and a toothpick inserted in the center comes out clean. Let them cool on the baking sheet for 5 minutes before transferring to a wire rack to cool completely.
Step 4 – Finish and Serve
While the cookies are cooling, prepare the filling by mixing the coconut cream, powdered erythritol, and vanilla extract in a bowl until smooth and creamy. Once the cookies are completely cool, spread a generous amount of the filling on the flat side of one cookie and sandwich it with another cookie, flat sides together. Repeat with the remaining cookies. Serve immediately or refrigerate for 30 minutes to firm up the filling. And there you have it—Homemade Devil Dogs ready to be enjoyed!
Tips for Perfect Results
Now, let’s talk about getting those Homemade Devil Dogs just right. You know, the kind that makes you do a little happy dance in the kitchen. Here are some tips to ensure your devil dogs turn out perfectly every time.
First, always use room temperature ingredients. I can’t stress this enough! It makes mixing so much easier and helps everything blend together smoothly. Imagine trying to mix cold butter into a batter—it’s like trying to convince a cat to take a bath. Not fun, right?
Next, let’s chat about the filling. If you want that creamy center to hold its shape, chill it for a bit before spreading it on your cookies. This little trick gives the filling a firmer texture, making it easier to work with and ensuring it doesn’t ooze out when you take a bite. Trust me, a little patience here goes a long way.
Finally, once you’ve assembled your devil dogs, store them in an airtight container. This keeps them fresh and prevents them from drying out. Plus, it makes them easy to grab when you’re in need of a quick, sweet pick-me-up. Just imagine opening your fridge to find a batch of these beauties waiting for you—it’s like a little slice of heaven!
Essential Equipment Needed
Alright, let’s dive into the nitty-gritty of what you’ll need to whip up these delightful Homemade Devil Dogs. Don’t worry, you won’t need a kitchen full of gadgets—just a few trusty tools that you probably already have on hand.
First up, a baking sheet and parchment paper are your best friends here. The baking sheet is where the magic happens, and the parchment paper ensures that your devil dogs don’t stick, making cleanup a breeze. It’s like having a non-stick superhero in your kitchen!
Next, you’ll need a couple of mixing bowls and a whisk. One bowl for your dry ingredients and another for the wet ones. The whisk is perfect for blending everything together smoothly. It’s like conducting a symphony, where each ingredient plays its part to create a harmonious batter.
Finally, a cookie scoop or a spoon will come in handy for portioning out the batter onto your baking sheet. A cookie scoop gives you perfectly uniform devil dogs, but a spoon works just as well if you prefer a more rustic look. Either way, you’ll end up with delicious treats that are sure to impress.
And there you have it! With these simple tools, you’re all set to create a batch of Homemade Devil Dogs that will have everyone asking for seconds. So, roll up those sleeves and get ready to bake up some magic!
Delicious Variations of Homemade Devil Dogs
Now, if you’re anything like me, you love a good twist on a classic. These Homemade Devil Dogs are already a treat, but why not have a little fun and experiment with some delicious variations? Trust me, these little tweaks can take your devil dogs from delightful to downright irresistible!
First up, let’s talk about adding a pinch of cinnamon to the batter. Cinnamon has this magical ability to add warmth and depth to any dessert. It’s like wrapping your taste buds in a cozy blanket on a chilly day. Just a small sprinkle can transform your devil dogs into a comforting, aromatic delight that pairs perfectly with a hot cup of coffee.
Feeling a bit adventurous? Try incorporating peppermint extract into the filling for a minty twist. It’s like giving your devil dogs a refreshing breath of fresh air. The coolness of the mint complements the rich chocolate flavor beautifully, making each bite a refreshing surprise. Plus, it’s a great way to add a festive touch during the holiday season!
And for those days when you’re craving a little extra indulgence, why not dip your devil dog sandwiches in melted sugar-free chocolate? It’s like dressing up your treats in a decadent chocolate coat. The smooth, glossy finish not only looks stunning but also adds an extra layer of chocolatey goodness. It’s the kind of treat that makes you feel like you’re enjoying a gourmet dessert, right in the comfort of your own home.
So go ahead, unleash your creativity and try these variations. Whether you’re in the mood for something warm and cozy, refreshingly minty, or decadently chocolatey, there’s a devil dog variation here for every craving. Happy experimenting!
Serving Suggestions
Now that you’ve got your Homemade Devil Dogs ready to go, let’s talk about how to serve them up in style. These delightful treats are versatile enough to pair with a variety of accompaniments, making them perfect for any occasion. Whether you’re enjoying a quiet moment to yourself or sharing with family and friends, these serving suggestions will elevate your devil dog experience to new heights.
First, consider pairing your devil dogs with a cup of keto-friendly coffee or tea. There’s something so comforting about sipping a warm beverage while nibbling on a sweet treat. The rich, chocolatey flavor of the devil dogs complements the bold notes of coffee or the soothing aroma of tea beautifully. It’s like a match made in dessert heaven, perfect for a cozy afternoon break or a leisurely weekend brunch.
If you’re in the mood for something fresh and vibrant, serve your devil dogs alongside fresh berries. The natural sweetness and slight tartness of berries like strawberries, raspberries, or blueberries provide a refreshing contrast to the rich chocolate flavor. It’s like a burst of sunshine on your plate, adding a pop of color and a delightful fruity twist to your dessert spread.
For those who enjoy a bit of crunch with their sweets, why not enjoy your devil dogs with a side of keto-friendly nuts? Almonds, pecans, or walnuts are excellent choices that add a satisfying crunch and a nutty flavor that pairs wonderfully with the soft, creamy texture of the devil dogs. It’s like a symphony of textures and flavors, creating a truly satisfying snacking experience.
So go ahead, get creative with your serving options and enjoy your Homemade Devil Dogs in a way that suits your taste and mood. Whether you’re indulging solo or sharing with loved ones, these serving suggestions are sure to make your devil dog experience even more delightful. Bon appétit!
FAQs About Homemade Devil Dogs
When it comes to making Homemade Devil Dogs, I know you might have a few questions. Don’t worry, I’ve got you covered! Here are some of the most common queries I get, along with my best tips and tricks to ensure your devil dogs turn out perfectly every time.
Can I use a different sweetener? Absolutely! One of the great things about this recipe is its flexibility. You can substitute erythritol with any keto-friendly sweetener you prefer. Whether it’s monk fruit, stevia, or allulose, just make sure to adjust the quantity according to the sweetness level of your chosen sweetener. It’s like having a little sweetener swap party in your kitchen!
How do I store leftover Devil Dogs? If you find yourself with a few extra devil dogs (lucky you!), storing them properly is key to maintaining their freshness. Simply place them in an airtight container and pop them in the fridge. They’ll stay delicious for up to a week. It’s like having a stash of sweet happiness waiting for you whenever you need a quick pick-me-up.
Can I freeze these treats? Yes, you can! Freezing is a fantastic option if you want to make a big batch and enjoy them over time. Just wrap each devil dog sandwich individually in plastic wrap or parchment paper, then place them in a freezer-safe bag or container. They’ll keep well in the freezer for up to a month. When you’re ready to indulge, simply thaw them in the fridge or at room temperature. It’s like having a secret dessert treasure trove in your freezer!
There you have it—answers to some of the most common questions about Homemade Devil Dogs. I hope these tips help you create the perfect batch of devil dogs that you and your loved ones will enjoy. Happy baking!
Final Thoughts on Homemade Devil Dogs
As I sit here, savoring the last bite of my Homemade Devil Dog, I can’t help but reflect on the sheer joy and simplicity of this recipe. It’s one of those rare gems that combines ease with indulgence, making it a perfect fit for our busy lives. Whether you’re a working mom juggling a million things or a professional looking for a quick sweet escape, these devil dogs are like a little slice of heaven that you can whip up without breaking a sweat.
What I love most about these Homemade Devil Dogs is how they bring a sense of nostalgia and comfort, all while being keto-friendly. It’s like having your cake and eating it too—literally! The rich, chocolatey flavor paired with the creamy filling is a match made in dessert heaven, and the best part? You don’t have to compromise on your dietary goals. It’s a win-win situation that leaves you feeling satisfied and guilt-free.
So, why not give this recipe a try? I promise, once you take that first bite, you’ll be hooked. It’s a delightful, keto-friendly dessert option that fits seamlessly into your busy lifestyle. Plus, it’s a fantastic way to treat yourself and your loved ones to something special, without spending hours in the kitchen. So go ahead, roll up your sleeves, and let these Homemade Devil Dogs bring a little sweetness and joy into your day. Happy baking!
Print
Whipped Ricotta & Hot Honey Crostini Clouds: A Must-Try!
- Total Time: 22 minutes
- Yield: 12 crostini 1x
- Diet: Vegetarian
Description
A delightful appetizer featuring creamy whipped ricotta topped with spicy hot honey, served on crispy crostini.
Ingredients
- 1 cup ricotta cheese
- 2 tablespoons honey
- 1 tablespoon olive oil
- 1/2 teaspoon red pepper flakes
- 1 baguette, sliced
- Salt to taste
Instructions
- Preheat the oven to 400°F (200°C).
- In a bowl, mix the ricotta cheese, olive oil, and salt until smooth and creamy.
- Spread the ricotta mixture onto the sliced baguette.
- Place the crostini on a baking sheet and bake for 10-12 minutes until golden and crispy.
- Drizzle hot honey over the crostini and sprinkle with red pepper flakes before serving.
Notes
- For a sweeter flavor, adjust the amount of honey to taste.
- Serve immediately for the best texture.
- Can be garnished with fresh herbs for added flavor.
- Prep Time: 10 minutes
- Cook Time: 12 minutes
- Category: Appetizer
- Method: Baking
- Cuisine: Italian
Nutrition
- Serving Size: 1 crostini
- Calories: 150
- Sugar: 5g
- Sodium: 200mg
- Fat: 7g
- Saturated Fat: 2g
- Unsaturated Fat: 3g
- Trans Fat: 0g
- Carbohydrates: 18g
- Fiber: 1g
- Protein: 4g
- Cholesterol: 10mg
Keywords: Whipped Ricotta, Hot Honey, Crostini, Appetizer
