Kefir Ranch Dip with Living Veggie Crudité is a delight!

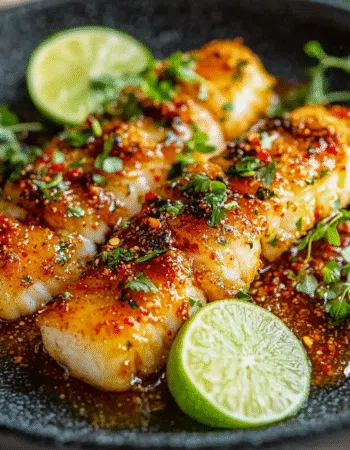
Introduction to Creamy Seafood Stuffed Shells Recipe
Let me tell you, the Creamy Seafood Stuffed Shells Recipe is like a warm hug after a long day. It’s the perfect solution for busy moms and working professionals who crave a delightful dinner without the fuss. Picture this: jumbo pasta shells filled with a savory seafood mixture, all wrapped up in a creamy, cheesy embrace. It’s a dish that feels like a mini-vacation on a plate, and trust me, your family will be asking for seconds.
What makes this dish truly irresistible is its rich, creamy nature. The combination of ricotta, mozzarella, and Parmesan cheeses creates a luscious filling that pairs beautifully with the tender shrimp and crab. It’s a symphony of flavors that will have everyone at the table singing your praises. Whether you’re cooking for a special occasion or just a regular Tuesday night, these stuffed shells are sure to become a family favorite.
Why You’ll Love This Creamy Seafood Stuffed Shells Recipe
Now, I know what you’re thinking: “I don’t have time for complicated recipes!” But fear not, because this Creamy Seafood Stuffed Shells Recipe is designed with busy schedules in mind. With quick preparation and minimal cleanup, it’s a lifesaver for those hectic weeknights. You can have a delicious, homemade meal on the table in no time, leaving you with more moments to relax and enjoy with your loved ones.
And let’s talk about the flavors. This dish is a crowd-pleaser, appealing to both adults and children alike. The creamy, cheesy filling is comforting and familiar, while the seafood adds a touch of elegance. It’s a win-win for everyone at the table, even the picky eaters. Plus, the leftovers (if there are any!) make for a fantastic lunch the next day.

Ingredients You’ll Need
- Jumbo pasta shells
- Ricotta cheese
- Shredded mozzarella cheese
- Cooked shrimp, chopped
- Cooked crab meat, chopped
- Grated Parmesan cheese
- Heavy cream
- Garlic, minced
- Dried oregano
- Dried basil
- Salt and pepper
- Olive oil
- Fresh parsley, chopped (for garnish)
Each ingredient plays a crucial role in building the flavors of this dish. The ricotta cheese provides a creamy base, while the mozzarella adds that gooey, melty goodness we all love. The shrimp and crab bring a delightful seafood flavor, perfectly complemented by the nutty Parmesan. And don’t forget the garlic, oregano, and basil—they add a fragrant, herby touch that ties everything together.
If you’re looking for substitutions, you can swap ricotta with cottage cheese for a lighter option. Or, if you’re feeling adventurous, toss in some chopped spinach for an extra boost of nutrition. Remember, the printable measurements are at the end of the article, so you can easily keep track of everything you need.
How to Make Creamy Seafood Stuffed Shells Recipe
Step 1 – Prep Ingredients
First things first, preheat your oven to 375°F. While that’s heating up, cook the jumbo pasta shells according to the package instructions until they’re al dente. You want them to have a little bite, as they’ll continue cooking in the oven. Once they’re done, drain them and set them aside to cool slightly.
Step 2 – Begin Cooking
In a large mixing bowl, it’s time to bring the magic together. Combine the ricotta, half of the mozzarella, shrimp, crab, Parmesan, heavy cream, garlic, oregano, basil, salt, and pepper. Mix until everything is well combined, and you have a creamy, seafood-filled mixture that’s ready to be stuffed into those shells.
Step 3 – Combine Ingredients
Now comes the fun part—stuffing the shells! Using a spoon, fill each pasta shell generously with the seafood mixture. Don’t be shy; you want them nice and full. Once stuffed, drizzle some olive oil in a baking dish to prevent sticking, and arrange the shells seam side up.
Step 4 – Finish and Serve
Sprinkle the remaining mozzarella over the top of the stuffed shells. Cover the dish with aluminum foil and bake for 20 minutes. Then, remove the foil and bake for an additional 10 minutes, or until the cheese is bubbly and golden. Let the dish cool slightly before garnishing with fresh parsley and serving. Voilà, dinner is served!
Tips for Perfect Results
- Use fresh seafood for the best flavor. It makes a world of difference!
- Prepare the filling a day ahead to save time. Just store it in the fridge until you’re ready to stuff the shells.
- Store leftovers in an airtight container for up to 3 days. They reheat beautifully!
Essential Equipment Needed
- Large mixing bowl
- Baking dish
- Aluminum foil
- Spoon for stuffing shells
If you don’t have a baking dish, a casserole dish works just as well. The key is to have something that can hold all those delicious shells snugly.
Delicious Variations of Creamy Seafood Stuffed Shells Recipe
- Add chopped spinach or artichokes for extra flavor and nutrition.
- Make it keto-friendly by using zucchini slices instead of pasta shells.
- Substitute shrimp with scallops for a different seafood twist.
Serving Suggestions
- Pair with a simple green salad for a balanced meal.
- Serve with garlic bread for a hearty side.
- Enjoy with a glass of white wine for a complete dining experience.
FAQs About Creamy Seafood Stuffed Shells Recipe
- Can I use frozen seafood? Yes, just ensure it’s fully thawed and drained before use.
- How can I make this dish spicier? Add a pinch of red pepper flakes to the filling.
- Is it possible to make this dish ahead of time? Absolutely, prepare and refrigerate up to 24 hours before baking.
Final Thoughts on Creamy Seafood Stuffed Shells Recipe
Reflecting on the ease and deliciousness of the Creamy Seafood Stuffed Shells Recipe, it’s clear why it’s a go-to for busy women. It’s a dish that brings joy to the table, with its comforting flavors and simple preparation. I encourage you to give it a try and savor the delightful flavors with your family. After all, a meal like this is more than just food—it’s a moment to cherish with those you love.
Print Kefir Ranch Dip with Living Veggie Crudité is a delight!
- Total Time: 40 minutes
- Yield: Serves 4-6 1x
- Diet: Vegetarian
Description
A delicious and healthy dip made with kefir, perfect for pairing with fresh vegetables.
Ingredients
- 1 cup kefir
- 1/2 cup sour cream
- 1 tablespoon dried dill
- 1 tablespoon garlic powder
- 1 tablespoon onion powder
- 1 teaspoon salt
- 1/2 teaspoon black pepper
- Assorted fresh vegetables (carrots, celery, bell peppers, etc.) for serving
Instructions
- In a mixing bowl, combine the kefir and sour cream.
- Add the dried dill, garlic powder, onion powder, salt, and black pepper to the mixture.
- Stir until all ingredients are well combined.
- Chill the dip in the refrigerator for at least 30 minutes to allow the flavors to meld.
- Serve the dip with an assortment of fresh vegetables for dipping.
Notes
- For a spicier dip, consider adding a pinch of cayenne pepper.
- This dip can be made a day in advance for better flavor.
- Store any leftovers in an airtight container in the refrigerator for up to 3 days.
- Prep Time: 10 minutes
- Cook Time: 0 minutes
- Category: Appetizer
- Method: No-cook
- Cuisine: American
Nutrition
- Serving Size: 2 tablespoons
- Calories: 50
- Sugar: 2g
- Sodium: 150mg
- Fat: 3g
- Saturated Fat: 1g
- Unsaturated Fat: 2g
- Trans Fat: 0g
- Carbohydrates: 4g
- Fiber: 0g
- Protein: 2g
- Cholesterol: 5mg
Keywords: Kefir Ranch Dip, Veggie Crudité, Healthy Dip, Appetizer


