Pan-Fried Halloumi Recipe
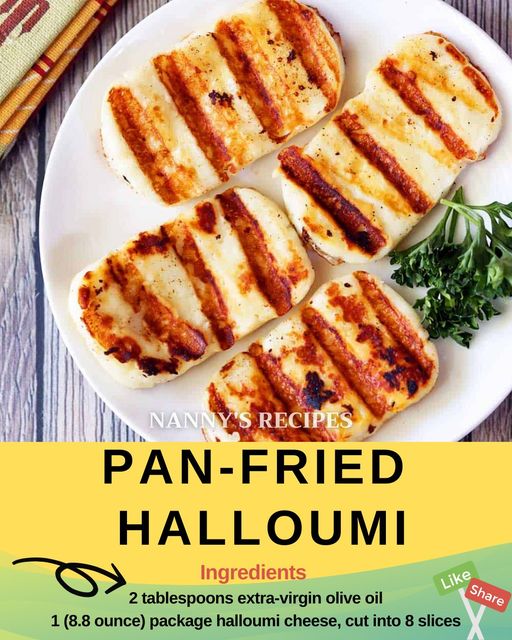
Pan-fried halloumi is an absolute delight for cheese lovers. With its firm, grillable texture, halloumi is the perfect cheese to fry, developing a crispy, golden-brown exterior while remaining soft and chewy inside. Originally from Cyprus, this semi-hard cheese has become a favorite in many cuisines around the world, especially in Mediterranean dishes. Its high melting point allows it to be fried or grilled without losing its shape, making it a versatile and delicious option for vegetarians and anyone looking for a flavorful, protein-rich meal.
Introduction
This recipe for pan-fried halloumi is simple, quick, and packed with flavor. Halloumi’s salty, savory profile pairs perfectly with a squeeze of fresh lemon and a drizzle of olive oil, creating a balanced dish that can be served as an appetizer, a topping for salads, or even a main course. Whether you’re new to halloumi or looking to perfect your technique, this detailed guide will walk you through every step of the process.
We’ll also explore the nutritional benefits of halloumi, how to serve it in a variety of dishes, and tips for achieving the perfect texture. Halloumi is not only delicious but also packed with protein and calcium, making it a healthy choice that can easily replace meat in many dishes. This cheese is ideal for those following a vegetarian diet, and its unique texture will leave you feeling satisfied. With this recipe, you’ll master the art of pan-frying halloumi and learn how to elevate its flavor with simple ingredients.
By following the steps below, you’ll create a dish that is crispy, savory, and full of Mediterranean flavors. From understanding how to slice the cheese for optimal cooking to mastering the perfect heat for frying, this recipe ensures you’ll never have to guess your way through cooking halloumi again. Let’s dive into this foolproof guide to pan-fried halloumi!
Why You’ll Love This Recipe
- Quick and Easy: Ready in under 10 minutes, making it perfect for busy weeknights or impromptu gatherings.
- Crispy Exterior, Chewy Interior: The contrast in textures makes every bite a delight.
- Rich in Protein: Halloumi is a great source of protein, making this a filling, nutritious dish.
- Versatile Serving Options: Pan-fried halloumi can be served with salads, grain bowls, or as an appetizer.
- Vegetarian-Friendly: A satisfying meat-free option that still feels hearty and indulgent.
Key Ingredients for Pan-Fried Halloumi
Halloumi Cheese (8 oz): Halloumi’s firm texture and high melting point make it ideal for frying. Slice it evenly to ensure all pieces cook at the same rate, resulting in a crispy exterior and chewy center.
Olive Oil (2 tablespoons): Use high-quality extra virgin olive oil for frying the halloumi. It adds a fruity note to the cheese and helps achieve a golden, crispy crust.
Lemon Juice (from 1 lemon): Fresh lemon juice cuts through the richness of the fried cheese, adding a tangy brightness that enhances the overall flavor.
Fresh Herbs (such as parsley or mint): Fresh herbs add a pop of color and a fragrant, herbal note that pairs perfectly with the salty halloumi.
Black Pepper: Freshly ground black pepper adds a mild heat that complements the savory, salty flavor of the halloumi.
How to Make Pan-Fried Halloumi
Step 1: Prepare the Halloumi
Start by removing the halloumi from its packaging and patting it dry with a paper towel. This step is essential to remove excess moisture, which helps the cheese develop a crispy crust when frying. Slice the halloumi into 1/4-inch thick slices. You can cut them slightly thicker or thinner depending on your preference, but 1/4 inch tends to give the best balance between a golden-brown crust and a soft, chewy center.
Step 2: Heat the Pan
Heat a large, non-stick skillet over medium-high heat. Add 2 tablespoons of olive oil and allow it to heat until it shimmers slightly. The pan should be hot enough to sear the halloumi, but not so hot that the oil starts to smoke. A well-heated pan ensures that the halloumi develops a beautiful golden-brown color on the outside.
Step 3: Fry the Halloumi
Once the oil is hot, carefully place the halloumi slices in the pan in a single layer, ensuring they don’t overlap. Fry the halloumi for 2-3 minutes on each side, or until each slice is golden brown and crispy on the edges. The cheese will become firmer and develop a crust, but it won’t melt. If the halloumi starts to release too much liquid, you may need to turn up the heat slightly to evaporate the moisture quickly.
Step 4: Add Lemon Juice and Fresh Herbs
After the halloumi is golden on both sides, remove it from the pan and place it on a serving dish. Squeeze the juice of one lemon over the hot cheese and sprinkle with freshly chopped herbs, such as parsley or mint. The lemon juice adds a zesty brightness, while the herbs give the dish a fresh finish.
Step 5: Serve Immediately
Pan-fried halloumi is best served hot, straight from the pan. The contrast between the crispy exterior and the soft interior is most enjoyable when the cheese is freshly cooked. You can serve it as an appetizer, with a salad, or as part of a Mediterranean-inspired meal with roasted vegetables and pita bread.
FAQs About Pan-Fried Halloumi
1. Why Doesn’t Halloumi Melt?
Halloumi has a high melting point, which allows it to retain its shape when exposed to high heat. This makes it perfect for frying or grilling without turning into a melted mess.
2. Can I Make Pan-Fried Halloumi Ahead of Time?
While halloumi is best served immediately after frying, you can prepare it ahead of time. Reheat the slices in a hot skillet for a minute or two to restore their crispy texture before serving.
3. Is Halloumi a Healthy Cheese?
Yes, halloumi is rich in protein and calcium, making it a nutritious choice. However, it is also high in sodium, so it’s best enjoyed in moderation.
4. Can I Use Less Oil When Frying Halloumi?
You can reduce the amount of oil, but be aware that halloumi needs enough oil to fry properly and achieve that golden, crispy texture.
5. What Are Some Serving Suggestions?
Pan-fried halloumi pairs well with fresh salads, roasted vegetables, or as a topping for grain bowls. It’s also delicious in sandwiches or wraps.
