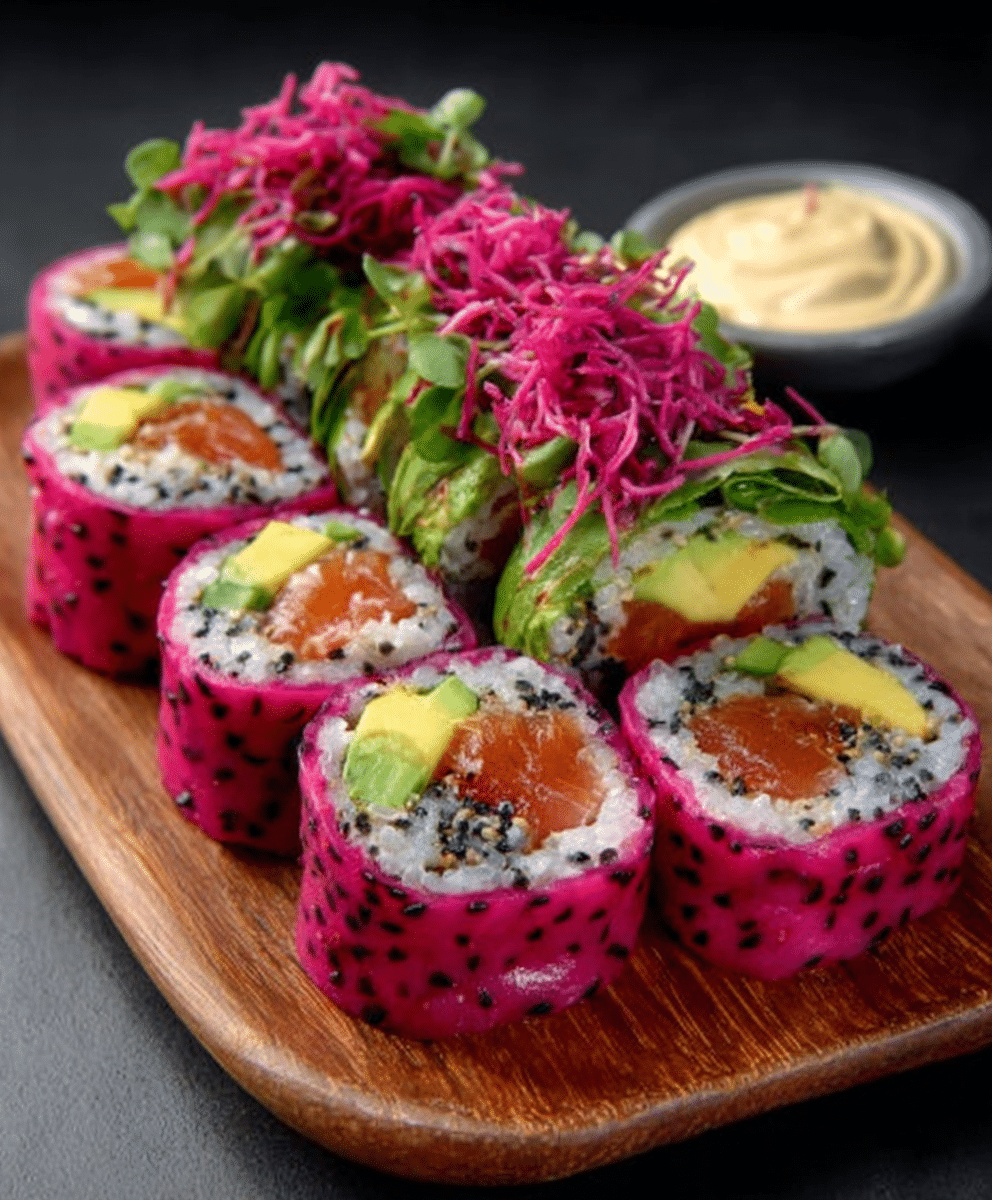
Dragon Fruit Sushi Burrito with Wasabi Mayo: A Colorful Treat!
Introduction to Marshmallow Whip Cheesecake Heaven
Let me take you on a little journey to dessert paradise with Marshmallow Whip Cheesecake Heaven. Imagine a dessert that feels indulgent yet is completely guilt-free. Yes, you heard that right! This delightful treat is perfect for those moments when you crave something sweet but want to stick to your healthy eating goals. As a busy mom or a working professional, finding time to whip up a dessert can feel like a luxury. But with Marshmallow Whip Cheesecake Heaven, you can have your cake and eat it too—literally! This recipe is designed with you in mind, offering a quick and satisfying solution to your dessert dilemmas.
Now, let’s talk about the star of the show: Marshmallow Whip Cheesecake Heaven. This dessert combines a rich chocolate crust with a creamy, marshmallow-infused filling. It’s like a cloud of sweetness that melts in your mouth, leaving you with a sense of pure bliss. And the best part? It’s keto-friendly, so you can indulge without the guilt. Whether you’re hosting a dinner party or simply treating yourself after a long day, this cheesecake is sure to impress.
Why You’ll Love This Marshmallow Whip Cheesecake Heaven
There are so many reasons to fall head over heels for this cheesecake. First off, it’s incredibly easy to make. With just a few simple steps, you can have a dessert that’s ready to impress. The preparation is quick, and the cleanup is minimal—perfect for those hectic days when time is of the essence. Plus, the flavors are family-friendly, making it a hit with both kids and adults alike.
But what truly sets this dessert apart is its keto-friendly nature. If you’re following a low-carb diet, you know how challenging it can be to find desserts that satisfy your sweet tooth without derailing your progress. Marshmallow Whip Cheesecake Heaven does just that. It offers all the sweetness you crave, thanks to ingredients like erythritol and sugar-free marshmallow fluff, without the added sugars. So go ahead, indulge in a slice (or two) and enjoy the sweet satisfaction without any guilt.
Ingredients You’ll Need
- 1 ½ cups almond flour
- ½ cup unsweetened cocoa powder
- ¼ cup erythritol (or preferred keto sweetener)
- ½ teaspoon baking powder
- ¼ teaspoon salt
- ½ cup unsalted butter, melted
- 1 large egg
- 1 teaspoon vanilla extract
- 16 ounces cream cheese, softened
- 1 cup heavy whipping cream
- ½ cup powdered erythritol
- 1 teaspoon vanilla extract
- 1 cup sugar-free marshmallow fluff
Each ingredient plays a crucial role in creating the perfect cheesecake. Almond flour forms the base of our crust, providing a nutty flavor and a gluten-free alternative to traditional flour. Unsweetened cocoa powder adds a rich chocolatey depth, while erythritol sweetens the deal without the carbs. The cream cheese and heavy whipping cream create a luscious, creamy filling, and the sugar-free marshmallow fluff adds that signature lightness and sweetness.
If you’re looking for substitutions, feel free to swap erythritol with your preferred keto sweetener. And if you’re not strictly keto, regular sugar can be used, though it will alter the nutritional profile. For those who love a bit of crunch, consider adding chopped nuts to the crust. Remember, printable measurements are provided at the article’s end for your convenience.
How to Make Marshmallow Whip Cheesecake Heaven
Step 1 – Prep Ingredients
First things first, preheat your oven to 350°F and grease a 9-inch springform pan. This will ensure your cheesecake comes out easily and looks picture-perfect. Next, gather and measure all your ingredients. Having everything ready to go will make the process smooth and stress-free.
Step 2 – Begin Cooking
In a mixing bowl, combine the dry ingredients for the crust: almond flour, cocoa powder, erythritol, baking powder, and salt. Stir in the melted butter, egg, and vanilla extract until a dough forms. Press this mixture evenly into the bottom of your prepared springform pan to create the crust. It’s like building the foundation of a delicious dessert skyscraper!
Step 3 – Combine Ingredients
Pop the crust into the oven and bake for 12-15 minutes, or until set. Once done, remove it from the oven and let it cool completely. Meanwhile, in a separate bowl, beat the softened cream cheese until smooth. Gradually add the powdered erythritol and vanilla extract, mixing until well combined. In another bowl, whip the heavy cream until stiff peaks form. Gently fold the whipped cream into the cream cheese mixture until fully incorporated. Finally, fold in the sugar-free marshmallow fluff until smooth.
Step 4 – Finish and Serve
Spread the filling evenly over the cooled crust. Cover and refrigerate for at least 4 hours, or overnight for best results. Before serving, slice and garnish with sugar-free chocolate shavings or fresh berries if desired. This cheesecake is a showstopper, and your taste buds will thank you!
Tips for Perfect Results
- Use room temperature cream cheese for a smoother filling.
- Chill the cheesecake overnight for the best texture.
- For easy slicing, use a warm knife.
Essential Equipment Needed
- Springform pan
- Mixing bowls
- Electric mixer
- Spatula
Delicious Variations of Marshmallow Whip Cheesecake Heaven
- Add sugar-free chocolate chips for a chocolate twist.
- Incorporate mashed raspberries or strawberries for a fruity flavor.
- Use a nut-based crust for added texture.
Serving Suggestions
- Pair with sugar-free chocolate shavings or fresh berries.
- Serve with pork rinds, celery sticks, or cucumber slices for a crunchy contrast.
FAQs About Marshmallow Whip Cheesecake Heaven
- Can I use regular sugar instead of erythritol? Yes, but it will no longer be keto-friendly.
- How long can I store this cheesecake? It can be refrigerated for up to 5 days.
- Can I freeze the cheesecake? Yes, wrap it tightly and freeze for up to 2 months.

Final Thoughts on Marshmallow Whip Cheesecake Heaven
Reflecting on the ease and deliciousness of making Marshmallow Whip Cheesecake Heaven, I can’t help but smile. This recipe is a testament to the fact that you don’t have to sacrifice flavor for health. It’s a satisfying, guilt-free dessert option that fits seamlessly into busy lifestyles and diverse dietary preferences. So, why not give it a try? Your taste buds—and your waistline—will thank you!
Print
Dragon Fruit Sushi Burrito with Wasabi Mayo: A Colorful Treat!
- Total Time: 50 minutes
- Yield: 2 burritos 1x
- Diet: Vegan
Description
A vibrant and delicious Dragon Fruit Sushi Burrito filled with fresh ingredients and topped with a zesty wasabi mayo.
Ingredients
- 1 large dragon fruit
- 1 cup sushi rice
- 2 tablespoons rice vinegar
- 1 cucumber, julienned
- 1 avocado, sliced
- 1 carrot, julienned
- Seaweed sheets
- Wasabi mayo (to taste)
Instructions
- Cook the sushi rice according to package instructions and mix with rice vinegar.
- Cut the dragon fruit in half and scoop out the flesh, then slice it into strips.
- Lay a seaweed sheet on a bamboo mat or clean surface.
- Spread a layer of sushi rice over the seaweed, leaving a small border at the top.
- Arrange the cucumber, avocado, carrot, and dragon fruit strips on top of the rice.
- Drizzle wasabi mayo over the fillings.
- Carefully roll the sushi burrito tightly, starting from the bottom and rolling towards the top.
- Slice the burrito in half and serve immediately.
Notes
- Feel free to add other vegetables or proteins as desired.
- Adjust the amount of wasabi mayo based on your spice preference.
- Serve with soy sauce or additional wasabi on the side.
- Prep Time: 20 minutes
- Cook Time: 30 minutes
- Category: Main Dish
- Method: Rolling
- Cuisine: Japanese
Nutrition
- Serving Size: 1 burrito
- Calories: 350
- Sugar: 10g
- Sodium: 200mg
- Fat: 15g
- Saturated Fat: 2g
- Unsaturated Fat: 10g
- Trans Fat: 0g
- Carbohydrates: 50g
- Fiber: 8g
- Protein: 6g
- Cholesterol: 0mg
Keywords: Dragon Fruit Sushi Burrito, Wasabi Mayo, Vegan Sushi, Colorful Sushi
