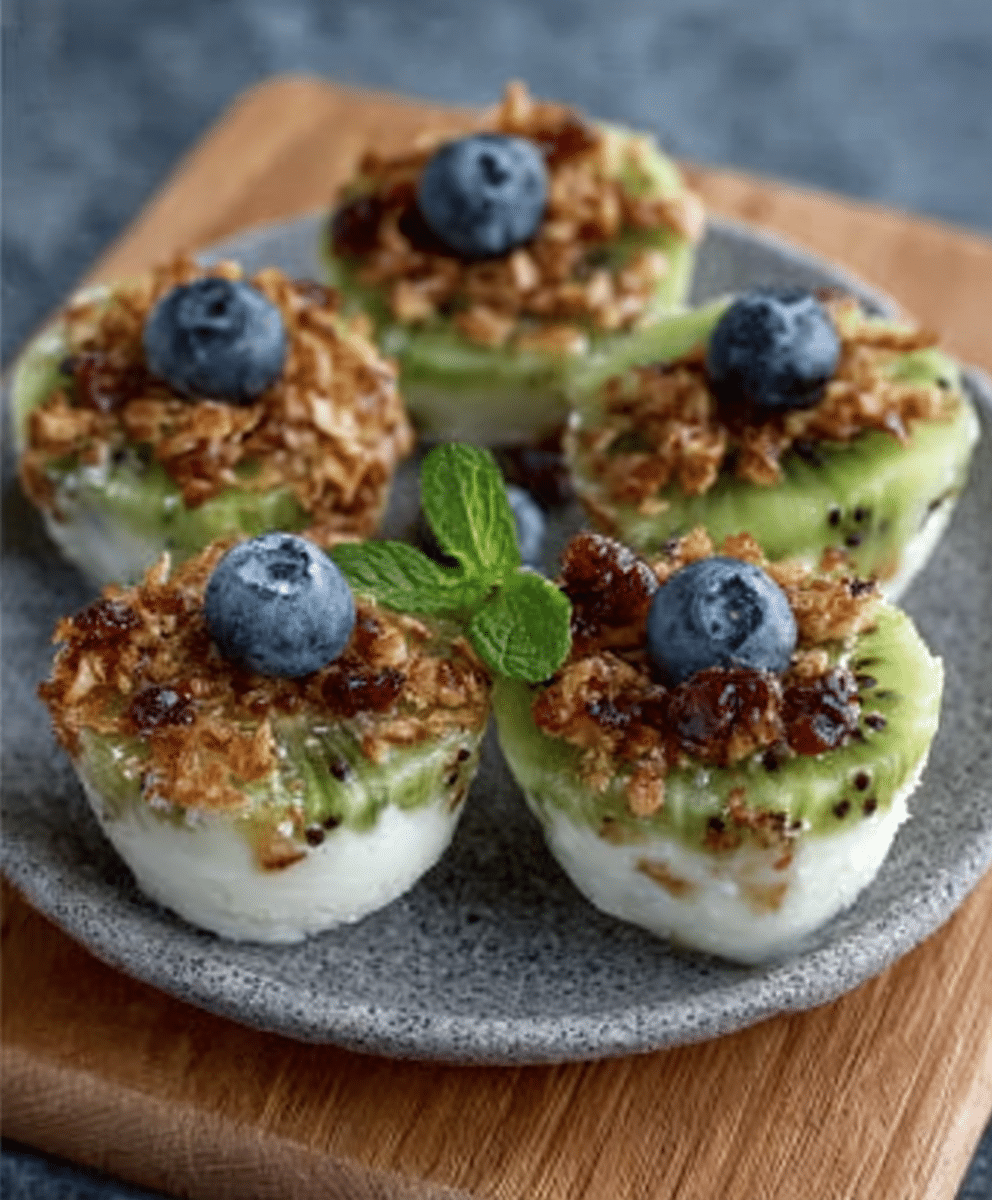
Honeydew Kiwi Yogurt Bites: Delight in a Healthy Snack!
gutenberg
Why You’ll Love This Honeydew Kiwi Yogurt Bites
Let me tell you, as a busy woman juggling family, work, and everything in between, I know how precious time can be. That’s why I absolutely adore these Honeydew Kiwi Yogurt Bites. They’re not just a snack; they’re a little moment of joy in my day. With just 15 minutes of prep time, you can whip up a batch of these delightful bites that will have your family asking for more!
First off, let’s talk about the preparation. You won’t need to spend hours in the kitchen. In fact, you can have these bites ready to freeze before you can even finish your cup of coffee! And the cleanup? Minimal! Just a mixing bowl and a baking sheet, and you’re done. It’s like a dream come true for anyone who’s ever felt overwhelmed by the thought of cooking after a long day.
Now, let’s get to the flavors. Honeydew and kiwi are a match made in heaven! The sweet, juicy honeydew pairs perfectly with the tartness of kiwi, creating a refreshing explosion of taste. Plus, the creamy Greek yogurt adds a rich texture that makes these bites feel indulgent without the guilt. It’s like having dessert, but you can feel good about it! And if you’re like me, trying to satisfy those sweet cravings without derailing your healthy eating goals, these bites are a lifesaver.
But wait, there’s more! These Honeydew Kiwi Yogurt Bites are family-friendly, too. I can’t tell you how many times I’ve had to negotiate with my kids over healthy snacks. But when I serve these colorful bites, they disappear faster than I can say “healthy treat.” The vibrant colors and fun shapes make them appealing to kids, and they’re packed with nutrients that you can feel good about giving them. It’s a win-win!
And let’s not forget about versatility. If your family isn’t a fan of honeydew or kiwi, no problem! You can easily swap in other fruits like strawberries or blueberries. The base recipe remains the same, so you can customize it to fit your family’s tastes. It’s like having a new snack every time you make them!
So, if you’re looking for a quick, nutritious option that your whole family will love, look no further than these Honeydew Kiwi Yogurt Bites. They’re easy to make, delicious, and perfect for busy days when you need a little something sweet without the guilt. Trust me, once you try them, you’ll be hooked!
Introduction to Honeydew Kiwi Yogurt Bites
Welcome to the world of Honeydew Kiwi Yogurt Bites—a refreshing and healthy snack that’s about to become your new best friend in the kitchen! If you’re like me, you often find yourself racing against the clock, trying to balance work, family, and a million other responsibilities. It can feel like a juggling act, and sometimes, the last thing you want to do is spend hours preparing a snack. That’s where these delightful bites come in!
Imagine this: it’s a busy afternoon, and the kids are home from school, hungry and ready to raid the pantry. Instead of reaching for those sugary snacks that leave you feeling guilty, you can whip up a batch of these Honeydew Kiwi Yogurt Bites in just 15 minutes! They’re not only quick to prepare, but they also pack a nutritional punch that will keep everyone satisfied and energized.
These bites are perfect for busy American women aged 40–70, whether you’re a mom juggling after-school activities or a professional trying to maintain a healthy lifestyle amidst a hectic schedule. With their vibrant colors and delicious flavors, they’re sure to please even the pickiest eaters in your family. Plus, they’re a fantastic way to sneak in some fruit without anyone batting an eye!
What I love most about these bites is their versatility. You can customize them to suit your family’s tastes, swapping in different fruits or even adding a sprinkle of your favorite nuts for a little crunch. They’re not just a snack; they’re a canvas for your creativity! And let’s be honest, who doesn’t love a snack that feels indulgent but is actually good for you?
So, if you’re ready to elevate your snacking game and bring a little joy back into your busy days, let’s dive into the delicious world of Honeydew Kiwi Yogurt Bites. Trust me, once you try them, you’ll wonder how you ever lived without this easy, healthy treat!
Ingredients You’ll Need
Alright, let’s get down to the nitty-gritty of what you’ll need to whip up these delightful Honeydew Kiwi Yogurt Bites. The best part? You probably have most of these ingredients hanging out in your kitchen already! Here’s the rundown:
- 1 cup honeydew, diced: This sweet, juicy fruit is the star of the show! Honeydew adds a refreshing sweetness that balances perfectly with the tartness of kiwi. Plus, it’s packed with vitamins C and B6, making it a nutritious choice.
- 1 cup kiwi, diced: Kiwi brings a zesty kick to the mix! Not only does it add a pop of color, but it’s also loaded with antioxidants and vitamin K. If you’re feeling adventurous, you can even use golden kiwi for a sweeter flavor!
- 1 cup Greek yogurt: This creamy goodness is what ties everything together. Greek yogurt is rich in protein and probiotics, making it a healthy base for our bites. If you prefer a lighter option, feel free to use low-fat or non-fat Greek yogurt.
- 2 tablespoons honey: A drizzle of honey adds just the right amount of sweetness. It’s a natural sweetener that complements the fruits beautifully. If you’re looking for a vegan alternative, agave syrup works like a charm!
- 1 teaspoon vanilla extract: This little ingredient packs a flavor punch! Vanilla extract enhances the overall taste, making these bites feel indulgent. If you’re out of vanilla, a sprinkle of cinnamon can add a lovely twist!
Now, if you’re not a fan of honeydew or kiwi, don’t fret! You can easily swap in other fruits like strawberries, blueberries, or even peaches. The beauty of these Honeydew Kiwi Yogurt Bites is their versatility. You can mix and match to suit your family’s preferences!
And let’s talk about healthy swaps. If you want to boost the protein content, consider adding a scoop of your favorite protein powder to the yogurt mixture. It’s a simple way to make these bites even more satisfying!
For those of you who love having everything organized, I’ve got you covered! Printable measurements for all the ingredients are provided at the end of the article, so you can easily reference them while you’re in the kitchen. Happy snacking!
How to Make Honeydew Kiwi Yogurt Bites
Now that you’ve gathered all your ingredients, it’s time to dive into the fun part—making these Honeydew Kiwi Yogurt Bites! Trust me, this process is as easy as pie (or should I say, as easy as yogurt bites?). Let’s get started!
Step 1 – Prep Ingredients
First things first, let’s prep our fruits! Start by dicing the honeydew. To do this, cut the honeydew in half and scoop out the seeds. Then, slice it into wedges and carefully cut away the rind. Once you have the flesh, chop it into bite-sized pieces. You want them small enough to mix well but big enough to enjoy the juicy goodness!
Next up is the kiwi. Slice off both ends of the kiwi, then use a spoon to scoop out the flesh. It’s like a little treasure hunt! Once you have the green goodness, chop it into similar-sized pieces as the honeydew. Having all your ingredients prepped and ready to go makes the process smoother and more enjoyable. Plus, it’s a great way to avoid any last-minute scrambling!
Step 2 – Begin Mixing
Now that your fruits are prepped, it’s time to mix the star of the show—our Greek yogurt! In a mixing bowl, combine the Greek yogurt, honey, and vanilla extract. Grab a whisk or a spatula and mix until everything is well combined. You want it to be smooth and creamy, with a lovely aroma wafting up to greet you. The honey will add a touch of sweetness, while the vanilla will make your kitchen smell divine!
As you mix, take a moment to appreciate the texture. It should be thick and luscious, almost like a cloud of creamy goodness. This is the base of our bites, and it’s going to be delicious!
Step 3 – Combine Ingredients
Now comes the fun part—folding in our diced honeydew and kiwi! Gently add the diced fruits to the yogurt mixture. Using a spatula, carefully fold the fruits into the yogurt. You want to be gentle here; we’re not trying to mash the fruits, just incorporate them into the creamy goodness. The vibrant colors of the honeydew and kiwi will make your mixture look like a beautiful summer day!
As you fold, you’ll notice the yogurt turning a lovely shade of green from the kiwi. It’s like a little celebration in your bowl! Make sure the fruits are evenly distributed so every bite is packed with flavor.
Step 4 – Finish and Serve
Alright, it’s time to get these bites ready for the freezer! Using a spoon or a cookie scoop, drop dollops of the mixture onto a baking sheet lined with parchment paper. Aim for about 1-2 tablespoons per dollop. They don’t have to be perfect; a little rustic charm is always welcome in the kitchen!
Once you’ve filled the baking sheet, pop it into the freezer. Let the bites freeze for about 2-3 hours or until they’re solid. This is the hardest part—waiting! But trust me, it’ll be worth it when you take that first bite.
After they’re frozen, carefully remove the bites from the baking sheet and transfer them to an airtight container. Store them in the freezer, and they’ll be ready for you whenever you need a quick, healthy snack. Just grab a couple, and you’re good to go!
And there you have it! Making Honeydew Kiwi Yogurt Bites is a breeze, and I promise you’ll love the refreshing taste. Now, let’s move on to some tips for perfect results!
Tips for Perfect Results
Now that you’ve mastered the basics of making Honeydew Kiwi Yogurt Bites, let’s sprinkle in some tips to elevate your snack game even further! These little nuggets of wisdom will help you enhance flavor, speed up prep time, and make your bites look as good as they taste.
1. Enhance the Flavor: Want to take your bites to the next level? Consider adding a pinch of salt to the yogurt mixture. It might sound counterintuitive, but a little salt can really bring out the sweetness of the honeydew and kiwi. You could also experiment with a dash of cinnamon or nutmeg for a warm, cozy flavor twist. Just a sprinkle can transform your bites into a delightful treat that feels extra special!
2. Speed Up Prep Time: If you’re short on time (and let’s be honest, who isn’t?), using pre-diced fruit can be a game-changer. Many grocery stores offer fresh, pre-cut honeydew and kiwi in their produce section. This little shortcut can save you precious minutes in the kitchen, allowing you to whip up these bites even faster. Just be sure to check the freshness date to ensure you’re getting the best quality!
3. Easy Storage: For those of you who love to meal prep, consider using silicone molds to freeze your bites. Not only do they make for easy removal, but they also create fun shapes that can make snacking even more enjoyable! Plus, you can pop out just a few at a time, so you won’t be tempted to eat the whole batch in one sitting (not that I’d judge you if you did!).
4. Make Them Visually Appealing: Presentation is key, especially when you’re serving these bites to family or friends. To make your Honeydew Kiwi Yogurt Bites look extra enticing, consider drizzling a little extra honey on top before freezing. You could also sprinkle some colorful toppings like shredded coconut, chopped nuts, or even a few mini chocolate chips for a fun twist. The vibrant colors of the fruits combined with these toppings will make your bites pop and look like a gourmet treat!
5. Get Creative with Shapes: If you’re feeling adventurous, try using cookie cutters to create fun shapes from the frozen bites. Once they’re solid, you can cut them into stars, hearts, or any shape that tickles your fancy. This is especially great for kids, as they’ll be more excited to eat something that looks fun and playful!
With these tips in your back pocket, you’ll be well on your way to creating the perfect Honeydew Kiwi Yogurt Bites that not only taste amazing but also look fabulous. So, roll up your sleeves and get ready to impress your family with these delightful, healthy snacks!
Essential Equipment Needed
Before we dive into making those delicious Honeydew Kiwi Yogurt Bites, let’s talk about the essential kitchen tools you’ll need. Don’t worry; you won’t need any fancy gadgets or equipment—just some basic items that you probably already have in your kitchen. Here’s what you’ll need:
- Mixing bowl: A good-sized mixing bowl is essential for combining all your ingredients. I recommend using a medium to large bowl so you have plenty of space to mix without making a mess. If you don’t have a mixing bowl, a large pot or even a deep plate can work in a pinch!
- Baking sheet: This is where the magic happens! You’ll need a baking sheet to drop your yogurt mixture onto. If you don’t have a baking sheet, a large plate or a cutting board can serve as an alternative. Just make sure it fits in your freezer!
- Parchment paper: Lining your baking sheet with parchment paper makes it super easy to remove the frozen bites later. If you’re out of parchment paper, you can lightly grease the baking sheet with a bit of cooking spray or oil to prevent sticking.
- Spoon or cookie scoop: You’ll need a spoon or a cookie scoop to drop dollops of the yogurt mixture onto the baking sheet. A cookie scoop is great for uniformity, but a regular spoon works just as well. If you’re feeling fancy, you can even use a piping bag for a fun presentation!
And there you have it! With these simple tools, you’ll be well-equipped to create your Honeydew Kiwi Yogurt Bites. Remember, the key is to keep it simple and enjoy the process. Happy snacking!
Delicious Variations of Honeydew Kiwi Yogurt Bites
Now that you’ve mastered the basic recipe for Honeydew Kiwi Yogurt Bites, let’s have some fun with variations! The beauty of this recipe lies in its versatility, allowing you to get creative and tailor it to your family’s tastes and dietary needs. Here are some delicious tweaks and adjustments to consider:
1. Flavor Twists: Want to add a little pizzazz to your bites? Consider sprinkling in a dash of cinnamon or nutmeg to the yogurt mixture. These warm spices can elevate the flavor profile and give your bites a cozy, comforting vibe. If you’re feeling adventurous, try adding a splash of almond or coconut extract for a tropical twist. Just a little goes a long way in transforming the taste!
2. Dietary Adjustments: If you’re following a vegan lifestyle or have dairy sensitivities, no worries! You can easily swap out the Greek yogurt for a dairy-free alternative. Look for coconut yogurt, almond yogurt, or cashew yogurt—these options are creamy and delicious, making them perfect substitutes. Just be sure to check the labels for added sugars or preservatives, as some brands can vary in taste and texture.
3. Boosting Protein: For those of you looking to amp up the protein content, consider adding a scoop of your favorite protein powder to the yogurt mixture. This is a fantastic way to make your Honeydew Kiwi Yogurt Bites even more satisfying, especially if you’re using them as a post-workout snack or a meal replacement. Just be mindful of the flavor of the protein powder you choose; vanilla or unflavored varieties work best to keep the fruity taste intact.
4. Nutty Additions: If you love a little crunch, try folding in some chopped nuts or seeds into the yogurt mixture. Almonds, walnuts, or even chia seeds can add a delightful texture and extra nutrients. Just be sure to chop them finely so they mix well with the yogurt and don’t overpower the fruity flavors.
5. Fruity Fusion: While honeydew and kiwi are a match made in heaven, don’t hesitate to mix in other fruits for a fruity fusion! Try adding diced strawberries, blueberries, or even mango for a tropical vibe. The more colorful the mixture, the more appealing it will be to your family. Plus, it’s a great way to use up any leftover fruit you have lying around!
6. Chocolate Drizzle: For a special treat, consider drizzling some melted dark chocolate over the frozen bites before serving. This adds a decadent touch that feels indulgent while still being a healthier option. Just melt a bit of dark chocolate in the microwave, let it cool slightly, and then drizzle it over the bites for a beautiful finish.
With these delicious variations, you can keep your Honeydew Kiwi Yogurt Bites exciting and fresh every time you make them. So go ahead, get creative, and let your taste buds guide you on this flavorful journey! Your family will love the surprises you whip up, and you’ll enjoy the satisfaction of knowing you’re serving them a healthy, homemade snack.
Serving Suggestions
Now that you’ve made your delightful Honeydew Kiwi Yogurt Bites, let’s talk about how to serve them up for maximum enjoyment! These bites are not only delicious on their own, but they also pair beautifully with a variety of other foods and drinks. Here are some practical, family-friendly serving suggestions that will elevate your snacking experience:
1. Serve with a Side of Granola: For a little extra crunch and texture, consider serving your Honeydew Kiwi Yogurt Bites with a side of granola. The nutty, crunchy goodness of granola complements the creamy yogurt bites perfectly. You can sprinkle some granola on top of the bites for added flair or serve it in a small bowl on the side for dipping. It’s a simple way to turn your healthy snack into a more filling treat that the whole family will love!
2. Pair with Herbal Tea: If you’re looking for a refreshing drink to accompany your bites, herbal tea is a fantastic choice! The light, soothing flavors of herbal tea, like chamomile or peppermint, can enhance the fruity taste of the yogurt bites. Brew a warm cup of tea, let it steep, and enjoy it alongside your frozen treats. It’s a lovely way to unwind after a busy day, and the combination feels like a mini spa experience right at home!
3. Refreshing Lemonade: On a hot day, nothing beats a glass of refreshing lemonade! The zesty, tangy flavor of lemonade pairs wonderfully with the sweet and creamy Honeydew Kiwi Yogurt Bites. You can make a simple homemade lemonade by mixing fresh lemon juice, water, and a touch of honey or agave syrup. Serve it over ice for a cool, thirst-quenching drink that complements your bites perfectly. It’s like a summer picnic in your own kitchen!
4. Create a Snack Platter: For a fun family gathering or a casual get-together with friends, consider creating a colorful snack platter featuring your Honeydew Kiwi Yogurt Bites. Add an assortment of fresh fruits, nuts, and even some dark chocolate squares for a little indulgence. This way, everyone can mix and match their favorite flavors, and it makes for a beautiful presentation that’s sure to impress!
5. Enjoy as a Breakfast Treat: Who says you can’t have these bites for breakfast? Pair them with a bowl of oatmeal or yogurt for a nutritious morning meal. The combination of creamy yogurt bites and hearty oats will keep you satisfied and energized throughout the morning. It’s a great way to start your day on a healthy note!
With these serving suggestions, you can take your Honeydew Kiwi Yogurt Bites to the next level and create a delightful snacking experience for you and your family. Whether you’re enjoying them as a quick snack, a refreshing dessert, or a fun breakfast treat, these bites are sure to bring smiles all around. So go ahead, get creative, and enjoy every delicious bite!
FAQs About Honeydew Kiwi Yogurt Bites
As you embark on your journey to create these delightful Honeydew Kiwi Yogurt Bites, you might have a few questions swirling around in your mind. Don’t worry; I’ve got you covered! Here are some frequently asked questions that will help you navigate the ins and outs of this delicious recipe:
What is the best way to store Honeydew Kiwi Yogurt Bites?
Once your Honeydew Kiwi Yogurt Bites are frozen solid, the best way to store them is in an airtight container. This will keep them fresh and prevent any freezer burn. You can store them in the freezer for up to a month, but trust me, they’ll likely be gone long before that! Just grab a couple whenever you need a quick, healthy snack!
Can I use other fruits in this recipe?
Absolutely! One of the best things about these Honeydew Kiwi Yogurt Bites is their versatility. If honeydew or kiwi isn’t your family’s favorite, feel free to swap in other fruits like strawberries, blueberries, or even peaches. The base recipe remains the same, so you can customize it to fit your family’s tastes. It’s like having a new snack every time you make them!
How long do these bites take to freeze?
Patience is key when it comes to freezing your Honeydew Kiwi Yogurt Bites. They typically take about 2-3 hours to freeze solid. I know it can be tough to wait, especially when you’re excited to try them, but trust me, the wait is worth it! Once they’re frozen, you’ll have a refreshing treat ready to enjoy whenever you need a little pick-me-up.
With these FAQs in mind, you’re all set to make your Honeydew Kiwi Yogurt Bites a delicious success! If you have any other questions or tips to share, feel free to reach out. Happy snacking!

Final Thoughts on Honeydew Kiwi Yogurt Bites
As I sit here enjoying a few of my Honeydew Kiwi Yogurt Bites, I can’t help but reflect on how easy and delightful this recipe truly is. It’s amazing how something so simple can bring such joy and satisfaction to my busy days. With just a handful of ingredients and a little bit of time, you can create a healthy snack that feels indulgent and refreshing all at once!
What I love most about these bites is their versatility. Whether you’re looking for a quick treat after a long day, a fun snack for the kids, or even a light dessert to satisfy your sweet tooth, these Honeydew Kiwi Yogurt Bites have got you covered. They’re like little bursts of sunshine, perfect for brightening up any moment!
So, if you haven’t tried making these yet, I wholeheartedly encourage you to give this simple recipe a go. You’ll be amazed at how quickly they come together and how much your family will love them. Plus, it’s a great way to sneak in some fruit and protein without anyone even noticing! Trust me, once you take that first bite, you’ll be hooked.
And remember, cooking doesn’t have to be complicated or time-consuming. With recipes like these Honeydew Kiwi Yogurt Bites, you can enjoy delicious, healthy snacks without the stress. So roll up your sleeves, gather your ingredients, and let the fun begin! Your taste buds (and your family) will thank you!
“`
Print
Honeydew Kiwi Yogurt Bites: Delight in a Healthy Snack!
- Total Time: 3 hours 15 minutes
- Yield: 12 bites 1x
- Diet: Vegan
Description
A refreshing and healthy snack made with honeydew, kiwi, and yogurt, perfect for a quick treat.
Ingredients
- 1 cup honeydew, diced
- 1 cup kiwi, diced
- 1 cup Greek yogurt
- 2 tablespoons honey
- 1 teaspoon vanilla extract
Instructions
- In a bowl, mix the Greek yogurt, honey, and vanilla extract until well combined.
- Fold in the diced honeydew and kiwi gently.
- Using a spoon, drop dollops of the mixture onto a baking sheet lined with parchment paper.
- Freeze for about 2-3 hours or until solid.
- Once frozen, remove from the baking sheet and store in an airtight container in the freezer.
Notes
- Feel free to substitute other fruits like strawberries or blueberries.
- These bites can be enjoyed as a healthy dessert or snack.
- Prep Time: 15 minutes
- Cook Time: 0 minutes
- Category: Snack
- Method: Freezing
- Cuisine: American
Nutrition
- Serving Size: 2 bites
- Calories: 80
- Sugar: 6g
- Sodium: 30mg
- Fat: 1g
- Saturated Fat: 0g
- Unsaturated Fat: 0g
- Trans Fat: 0g
- Carbohydrates: 15g
- Fiber: 1g
- Protein: 3g
- Cholesterol: 5mg
Keywords: Honeydew, Kiwi, Yogurt, Healthy Snack, Frozen Treat
