Crispy Lion’s Mane Mushroom “Steak”: A Delicious Recipe!
Introduction to Frosted Coffee Brownies
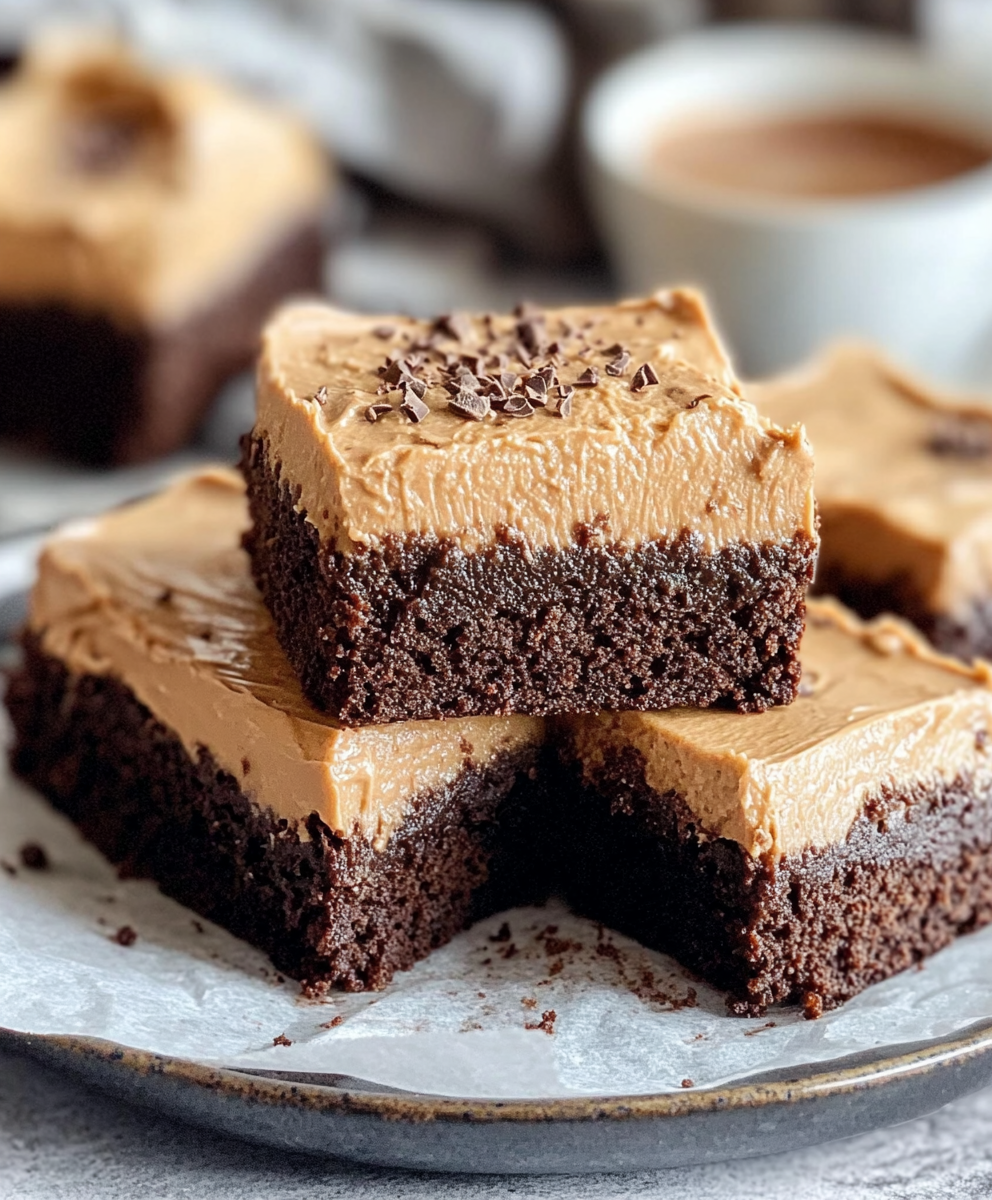
Let me tell you, there’s nothing quite like the aroma of freshly baked brownies wafting through the house. And when those brownies are Frosted Coffee Brownies, well, that’s a whole new level of deliciousness. These aren’t just any brownies; they’re a delightful keto-friendly dessert that combines the rich, comforting flavors of coffee and chocolate. Perfect for those of us who crave a sweet treat without the guilt.
As a busy mom and professional, I know how precious time can be. Between juggling work, family, and everything in between, finding a moment to indulge can feel like a luxury. That’s why this recipe is a game-changer. It’s quick, satisfying, and oh-so-easy to whip up. Whether you’re looking to impress your family or simply treat yourself after a long day, these Frosted Coffee Brownies are your go-to solution.
Why You’ll Love This Frosted Coffee Brownies
First off, let’s talk about the prep time. With just a few simple steps, you can have these brownies ready to bake in no time. And the best part? Minimal cleanup. I mean, who has time for a mountain of dishes, right? The rich flavors of coffee and chocolate are a match made in heaven, and they’re sure to win over even the pickiest of eaters in your household.
Plus, these brownies are keto-friendly, which means you can indulge without the guilt. It’s like having your cake and eating it too, or in this case, your brownie. So, whether you’re following a low-carb diet or just looking for a healthier dessert option, these Frosted Coffee Brownies are a perfect fit.
Ingredients You’ll Need
- 1 cup almond flour
- 1/2 cup unsweetened cocoa powder
- 1/2 teaspoon baking powder
- 1/4 teaspoon salt
- 1/2 cup granulated erythritol (or your preferred keto sweetener)
- 1/2 cup unsalted butter, melted
- 3 large eggs
- 1 teaspoon vanilla extract
- 1/4 cup brewed coffee, cooled
- 1/4 cup sugar-free chocolate chips (optional)
- For the frosting:
- 1/4 cup unsweetened cocoa powder
- 1/4 cup unsweetened almond milk
- 1/4 cup powdered erythritol
- 1 teaspoon vanilla extract
Each ingredient plays a crucial role in creating the perfect brownie. Almond flour gives it a nutty base, while unsweetened cocoa powder adds that deep chocolate flavor we all love. If you’re out of almond flour, coconut flour can be a great substitute, though you’ll need to adjust the quantity since it’s more absorbent. And if erythritol isn’t your sweetener of choice, stevia works just as well. Remember, printable measurements are available at the end of this article for your convenience.
How to Make Frosted Coffee Brownies
Step 1 – Prep Ingredients
Alright, let’s get started! First things first, preheat your oven to 350°F (175°C). This ensures that your Frosted Coffee Brownies bake evenly and to perfection. Next, grab an 8×8-inch baking pan and give it a good greasing. You can use a bit of butter or a non-stick spray—whatever you have on hand. This step is crucial to prevent the brownies from sticking, making cleanup a breeze.
Now, gather all your ingredients. Trust me, having everything measured and ready to go makes the process so much smoother. It’s like setting up your own little cooking show in your kitchen. Plus, it saves you from the dreaded mid-recipe scramble for that one missing ingredient.
Step 2 – Begin Cooking
With your ingredients prepped, it’s time to dive into the mixing. In one bowl, combine your dry ingredients: almond flour, unsweetened cocoa powder, baking powder, salt, and granulated erythritol. Give them a good stir to ensure everything is evenly distributed. This is where the magic begins, as these dry ingredients form the base of your delicious brownies.
In a separate bowl, whisk together the wet ingredients: melted butter, eggs, vanilla extract, and that all-important brewed coffee. The coffee not only enhances the chocolate flavor but also adds a subtle depth that makes these brownies truly special. Once your wet ingredients are well combined, it’s time to bring everything together. Pour the wet mixture into the dry ingredients and stir until just combined. If you’re feeling a little extra indulgent, fold in those sugar-free chocolate chips. They’re optional, but who doesn’t love a little extra chocolate?
Step 3 – Combine Ingredients
Now that your batter is ready, pour it into the prepared baking pan. Use a spatula to spread it out evenly, making sure it reaches all the corners. This ensures that every bite of your Frosted Coffee Brownies is as delicious as the last.
Pop the pan into your preheated oven and let it bake for 20-25 minutes. You’ll know they’re done when a toothpick inserted into the center comes out mostly clean. Remember, a few moist crumbs are okay—it’s a sign of a perfectly fudgy brownie. While the brownies bake, take a moment to enjoy the heavenly aroma filling your kitchen. It’s a little preview of the deliciousness to come.
Step 4 – Finish and Serve
Once your brownies are out of the oven, let them cool in the pan for about 10 minutes. This gives them a chance to set, making them easier to handle. After that, transfer them to a wire rack to cool completely. Patience is key here, as frosting warm brownies can lead to a melty mess.
While the brownies are cooling, it’s time to whip up the frosting. In a bowl, whisk together the unsweetened cocoa powder, unsweetened almond milk, powdered erythritol, and vanilla extract until smooth. This frosting is the cherry on top, adding a creamy, chocolatey layer that takes these brownies to the next level.
Once the brownies are completely cool, spread the frosting evenly over the top. Use a spatula to get a nice, smooth finish. Finally, cut your Frosted Coffee Brownies into squares and serve. Whether you’re enjoying them with a cup of coffee or sharing them with loved ones, these brownies are sure to be a hit. Enjoy!
Tips for Perfect Results
Ah, the sweet satisfaction of baking the perfect batch of Frosted Coffee Brownies! But before you dive in, let me share a few tips that will elevate your brownie game to new heights. Trust me, these little nuggets of wisdom can make all the difference.
First up, use room temperature ingredients. I can’t stress this enough. When your eggs and butter are at room temperature, they mix more easily with the other ingredients, resulting in a smoother batter. This means your brownies will have a more even texture, and who doesn’t love a brownie that’s perfectly fudgy all the way through?
Now, here’s a tip for those of you who can resist the temptation to dig in right away: let the brownies sit overnight. I know, I know, it’s hard to wait, but trust me on this one. Allowing the brownies to rest gives the flavors time to meld and deepen, resulting in a richer, more intense chocolate and coffee experience. It’s like letting a fine wine breathe—worth the wait!
Finally, store your brownies in an airtight container to maintain their freshness. This is especially important if you plan on savoring them over a few days. Keeping them sealed will prevent them from drying out, ensuring that each bite is as moist and delicious as the first. If you’re anything like me, you’ll want to enjoy these Frosted Coffee Brownies for as long as possible!
With these tips in your back pocket, you’re well on your way to brownie perfection. Happy baking!
Essential Equipment Needed
Before you dive into making these scrumptious Frosted Coffee Brownies, let’s talk about the essential equipment you’ll need. Having the right tools on hand can make the process smoother and more enjoyable. Plus, it saves you from those last-minute kitchen scavenger hunts!
- Mixing bowls: You’ll need at least two mixing bowls—one for your dry ingredients and another for the wet ones. I recommend using bowls with a non-slip base to keep them steady while you mix. Trust me, it makes whisking a breeze!
- Whisk: A good whisk is your best friend when it comes to combining ingredients smoothly. Whether you’re mixing the batter or whipping up the frosting, a sturdy whisk will help you achieve that perfect consistency without any lumps.
- 8×8-inch baking pan: This is the perfect size for our Frosted Coffee Brownies, ensuring they bake evenly and to the right thickness. If you don’t have an 8×8-inch pan, a 9×9-inch can work too, but keep an eye on the baking time as it might be slightly shorter.
- Wire rack: Cooling your brownies on a wire rack is crucial. It allows air to circulate around the brownies, helping them cool evenly and preventing them from becoming soggy. Plus, it speeds up the cooling process, so you can get to the frosting part sooner!
- Spatula: A spatula is indispensable for spreading the brownie batter evenly in the pan and for applying the frosting smoothly. I love using a silicone spatula because it’s flexible and easy to clean. It’s like having an extra hand in the kitchen!
With these tools at your disposal, you’re all set to create a batch of Frosted Coffee Brownies that will have everyone coming back for seconds. So, gather your equipment, roll up your sleeves, and let’s get baking!
Delicious Variations of Frosted Coffee Brownies
One of the joys of baking is the freedom to experiment and make a recipe truly your own. With these Frosted Coffee Brownies, there are plenty of ways to add a personal touch and keep things exciting. Here are a few delicious variations that you might want to try:
Add a teaspoon of instant coffee granules for a mocha twist: If you’re a coffee lover like me, you’ll adore this variation. By adding a teaspoon of instant coffee granules to the brownie batter, you can intensify the coffee flavor, creating a delightful mocha experience. It’s like having your favorite coffee shop treat right at home. The granules dissolve into the batter, infusing every bite with a rich, aromatic coffee essence that pairs beautifully with the chocolate.
Substitute almond milk with coconut milk for a different flavor profile: Looking to switch things up? Try using coconut milk in the frosting instead of almond milk. This simple swap adds a subtle tropical note to your brownies, making them feel a bit more exotic. The creamy texture of coconut milk also enhances the frosting’s smoothness, giving it a luscious, velvety finish. It’s a small change that can make a big difference, especially if you’re a fan of coconut’s unique flavor.
Use chopped nuts or seeds for added texture: For those who enjoy a bit of crunch in their desserts, adding chopped nuts or seeds is a fantastic option. Walnuts, pecans, or almonds work wonderfully, providing a satisfying contrast to the soft, fudgy brownies. If you’re feeling adventurous, try sprinkling some sunflower or pumpkin seeds on top of the frosting for a nut-free alternative. Not only do they add texture, but they also bring a delightful nutty flavor that complements the chocolate and coffee notes perfectly.
These variations are just the tip of the iceberg. Feel free to get creative and experiment with other ingredients you love. After all, the best part of baking is making it your own. So go ahead, have fun, and enjoy every delicious bite of your personalized Frosted Coffee Brownies!
Serving Suggestions
Now that you’ve baked these delightful Frosted Coffee Brownies, let’s talk about how to serve them in a way that elevates the experience even further. Whether you’re enjoying a quiet moment to yourself or sharing with family and friends, these serving suggestions will add a special touch to your dessert.
Pair with a cup of keto-friendly coffee or tea: There’s something magical about enjoying a warm brownie with a hot beverage. The rich, chocolatey flavors of the brownies are beautifully complemented by a steaming cup of coffee or tea. If you’re following a keto diet, opt for a keto-friendly coffee with a splash of heavy cream or a sugar-free sweetener. The warmth of the drink enhances the flavors of the brownies, creating a cozy, comforting experience that’s perfect for any time of day.
Serve with a side of fresh berries for a refreshing contrast: Looking to add a pop of color and a burst of freshness to your dessert plate? Fresh berries are the way to go. Strawberries, raspberries, or blueberries provide a delightful contrast to the rich, fudgy brownies. Their natural sweetness and slight tartness balance the chocolate and coffee flavors, making each bite feel light and refreshing. Plus, the vibrant colors of the berries make for a visually stunning presentation that’s sure to impress.
Enjoy with a dollop of whipped cream for extra indulgence: If you’re in the mood for a little extra indulgence, a dollop of whipped cream is the perfect finishing touch. The creamy, airy texture of the whipped cream pairs wonderfully with the dense, fudgy brownies, creating a luxurious mouthfeel that’s hard to resist. For a keto-friendly option, whip up some heavy cream with a touch of vanilla extract and your preferred keto sweetener. It’s a simple addition that takes these Frosted Coffee Brownies to the next level of decadence.
With these serving suggestions, you’re all set to enjoy your Frosted Coffee Brownies in style. Whether you’re savoring them solo or sharing with loved ones, these ideas will enhance the experience and make every bite even more enjoyable. So go ahead, treat yourself, and relish the deliciousness of these delightful brownies!
FAQs About Frosted Coffee Brownies
As you embark on your journey to create these delectable Frosted Coffee Brownies, you might have a few questions. Don’t worry, I’ve got you covered! Here are some frequently asked questions that will help you along the way:
Can I make these brownies dairy-free? Absolutely! If you’re looking to make these brownies dairy-free, simply substitute the unsalted butter with coconut oil. Coconut oil is a fantastic alternative that maintains the rich, moist texture of the brownies while adding a subtle hint of coconut flavor. It’s a great option for those with dairy sensitivities or anyone looking to try something a little different. Just make sure to use refined coconut oil if you prefer a neutral taste without the coconut aroma.
How do I store leftover brownies? If you find yourself with leftover Frosted Coffee Brownies (a rare occurrence, I know!), you’ll want to store them properly to keep them fresh. Place the brownies in an airtight container and keep them at room temperature. This will help maintain their fudgy texture and prevent them from drying out. Stored this way, your brownies will stay delicious for up to 3 days. If you’re anything like me, though, they might not last that long!
Can I freeze these brownies? Yes, you can! Freezing is a great way to extend the life of your brownies and have a sweet treat ready whenever the craving strikes. To freeze, wrap each brownie individually in plastic wrap or aluminum foil, then place them in a resealable freezer bag. This extra layer of protection helps prevent freezer burn and keeps your brownies tasting fresh. When you’re ready to enjoy them, simply thaw at room temperature or give them a quick zap in the microwave for a warm, gooey treat. Frozen brownies can be stored for up to 3 months, making them a perfect make-ahead dessert option.
Final Thoughts on Frosted Coffee Brownies
As I sit here, savoring the last bite of my Frosted Coffee Brownie, I can’t help but reflect on the sheer joy and simplicity of making these delightful treats. There’s something truly magical about combining the rich flavors of coffee and chocolate into a dessert that’s not only delicious but also keto-friendly. It’s like having a little piece of indulgence that fits perfectly into a busy lifestyle.
What I love most about these brownies is how easy they are to whip up. With just a handful of ingredients and a few simple steps, you can create a dessert that feels like a special occasion treat, even on the busiest of days. Whether you’re a seasoned baker or just starting out, this recipe is approachable and forgiving, making it a perfect choice for anyone looking to satisfy their sweet tooth without spending hours in the kitchen.
I encourage you to give this recipe a try, especially if you’re on the hunt for a quick, keto-friendly dessert option. These Frosted Coffee Brownies are not only a treat for the taste buds but also a testament to the fact that you don’t have to sacrifice flavor for health. They’re a wonderful way to indulge in a little self-care, whether you’re enjoying a quiet moment alone or sharing with family and friends.
And let’s not forget the versatility of this recipe. With so many delicious variations and serving suggestions, you can easily tailor these brownies to suit your personal preferences or dietary needs. From adding a mocha twist to experimenting with different toppings, the possibilities are endless. It’s a recipe that invites creativity and encourages you to make it your own.
So, the next time you’re in need of a sweet escape, remember these Frosted Coffee Brownies. They’re a delightful reminder that even in the midst of a hectic schedule, there’s always time for a little indulgence. Happy baking, and may your kitchen be filled with the comforting aroma of chocolate and coffee!
Print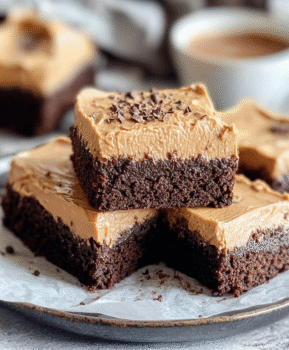
Crispy Lion’s Mane Mushroom “Steak”: A Delicious Recipe!
- Total Time: 25 minutes
- Yield: 2 servings 1x
- Diet: Vegan
Description
A delicious recipe for preparing crispy Lion’s Mane mushroom steak, perfect for a plant-based meal.
Ingredients
- 1 large Lion’s Mane mushroom
- 1 cup breadcrumbs
- 1/2 cup all-purpose flour
- 1/2 cup plant-based milk
- 1 teaspoon garlic powder
- 1 teaspoon onion powder
- Salt and pepper to taste
- Oil for frying
Instructions
- Clean the Lion’s Mane mushroom and slice it into thick steaks.
- In a bowl, mix the flour, garlic powder, onion powder, salt, and pepper.
- Dip each mushroom steak into the flour mixture, then into the plant-based milk, and finally coat with breadcrumbs.
- Heat oil in a frying pan over medium heat.
- Fry the mushroom steaks for about 3-4 minutes on each side until golden brown and crispy.
- Remove from the pan and place on paper towels to drain excess oil.
- Serve hot with your favorite dipping sauce.
Notes
- Ensure the oil is hot enough before frying to achieve a crispy texture.
- Feel free to add your favorite spices to the breadcrumb mixture for extra flavor.
- This recipe can be easily doubled for larger servings.
- Prep Time: 10 minutes
- Cook Time: 15 minutes
- Category: Main Course
- Method: Frying
- Cuisine: Vegan
Nutrition
- Serving Size: 1 mushroom steak
- Calories: 250
- Sugar: 1g
- Sodium: 300mg
- Fat: 10g
- Saturated Fat: 1g
- Unsaturated Fat: 9g
- Trans Fat: 0g
- Carbohydrates: 35g
- Fiber: 3g
- Protein: 5g
- Cholesterol: 0mg
Keywords: Crispy Lion’s Mane Mushroom Steak, Vegan Mushroom Recipe, Plant-Based Steak
