Cherry Coconut Magic Bars: Indulge in Easy Sweetness!
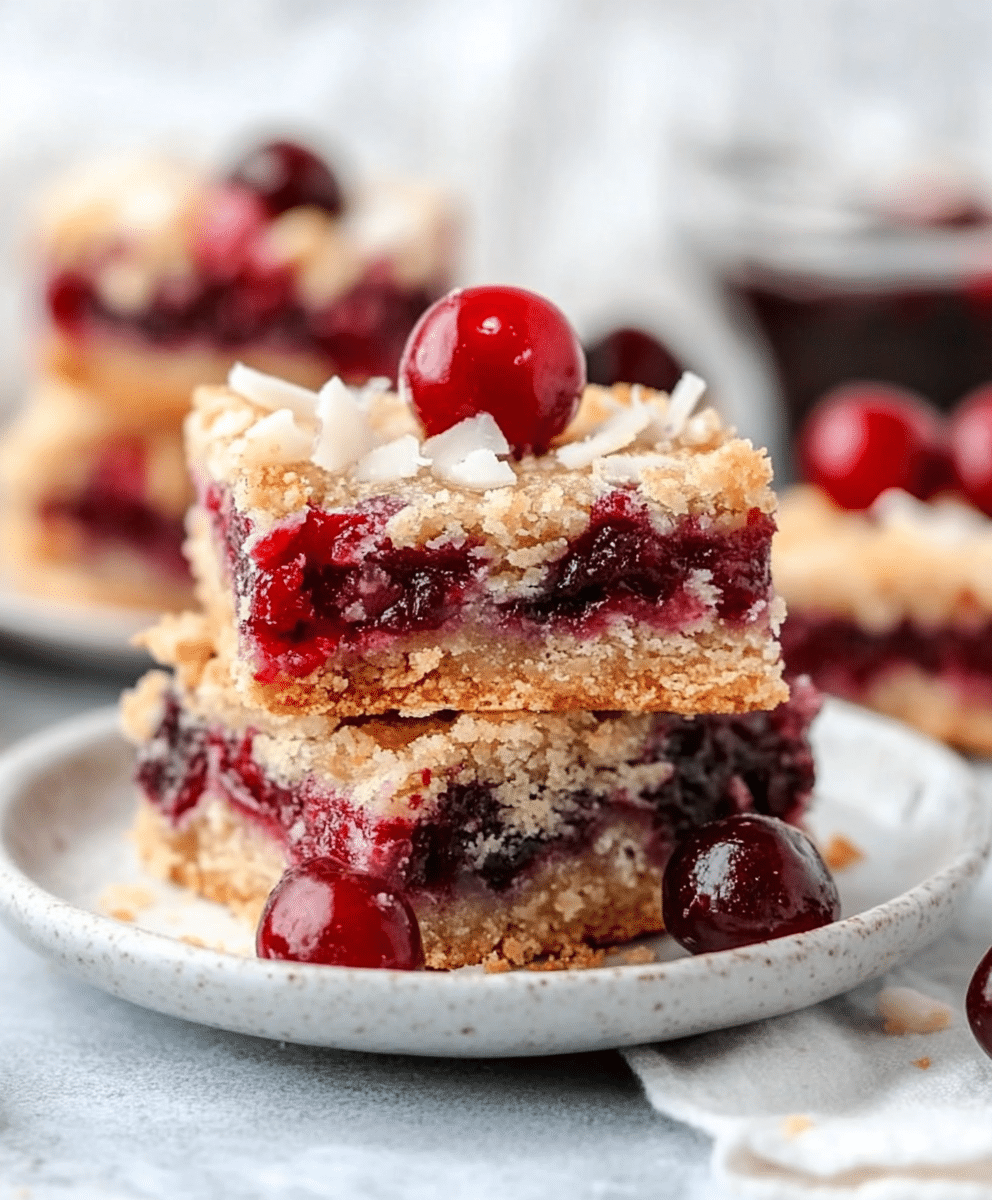
Why You’ll Love This Cherry Coconut Magic Bars
Let me tell you, if you’re a busy woman juggling a million things at once, these Cherry Coconut Magic Bars are about to become your new best friend in the kitchen! Seriously, they’re like a sweet hug at the end of a long day. With just 15 minutes of prep time and minimal cleanup, you can whip up a batch of these delightful treats without breaking a sweat.
Imagine this: you’ve just come home from a hectic day, and the last thing you want to do is spend hours in the kitchen. But you also want something sweet to enjoy with your evening tea or to satisfy those pesky cravings. That’s where these magic bars come in! They’re quick, easy, and oh-so-delicious, making them perfect for busy women like us.
What’s even better? The flavors! The combination of sweet cherries and rich coconut is like a tropical vacation for your taste buds. Plus, they’re family-friendly! Kids and adults alike will love the chewy texture and the hint of chocolate. I can’t tell you how many times I’ve made these bars, only to have my family devour them in record time. It’s like they disappear into thin air!
And let’s not forget about the versatility. You can easily customize these bars to suit your family’s preferences. Want to add some nuts for a little crunch? Go for it! Prefer a different dried fruit? The world is your oyster! These bars are a blank canvas just waiting for your creative touch.
So, if you’re looking for a quick and satisfying dessert that will please everyone in your household, look no further than these Cherry Coconut Magic Bars. They’re not just a treat; they’re a lifesaver for busy days!
Introduction to Cherry Coconut Magic Bars
Welcome to the world of Cherry Coconut Magic Bars, where sweet dreams come true in just a matter of minutes! If you’re like me—a busy woman navigating the whirlwind of life—finding time to indulge in a delicious treat can feel like searching for a needle in a haystack. But fear not! These magic bars are here to save the day, offering a delightful escape from the daily grind.
Picture this: you’ve just wrapped up a long day filled with meetings, errands, and maybe even a bit of chaos. The last thing you want to do is spend hours in the kitchen, right? That’s where these bars shine! With a prep time of only 15 minutes, you can have a batch of these scrumptious treats ready to pop in the oven before you can even pour yourself a glass of wine. Talk about a win-win!
What makes these bars truly magical is their combination of flavors. The sweet, tangy cherries dance beautifully with the rich, nutty coconut, creating a symphony of taste that’s simply irresistible. And let’s not forget the hint of chocolate that adds a touch of decadence. It’s like a tropical vacation for your taste buds, all wrapped up in a convenient little square!
Whether you’re looking for a quick dessert to impress guests or a sweet pick-me-up after a long day, these Cherry Coconut Magic Bars are the answer. They’re not just easy to make; they’re also incredibly satisfying. Plus, they’re a hit with the whole family! I can’t tell you how many times I’ve made these bars, only to find my kids sneaking back for seconds (or thirds!).
So, if you’re ready to treat yourself to something special without the fuss, let’s dive into the delightful world of Cherry Coconut Magic Bars. Trust me, your taste buds will thank you!
Why You’ll Love This Cherry Coconut Magic Bars
Let me tell you, if you’re a busy woman juggling a million things at once, these Cherry Coconut Magic Bars are about to become your new best friend in the kitchen! Seriously, they’re like a sweet hug at the end of a long day. With just 15 minutes of prep time and minimal cleanup, you can whip up a batch of these delightful treats without breaking a sweat.
Imagine this: you’ve just come home from a hectic day, and the last thing you want to do is spend hours in the kitchen. But you also want something sweet to enjoy with your evening tea or to satisfy those pesky cravings. That’s where these magic bars come in! They’re quick, easy, and oh-so-delicious, making them perfect for busy women like us.
What’s even better? The flavors! The combination of sweet cherries and rich coconut is like a tropical vacation for your taste buds. Plus, they’re family-friendly! Kids and adults alike will love the chewy texture and the hint of chocolate. I can’t tell you how many times I’ve made these bars, only to have my family devour them in record time. It’s like they disappear into thin air!
And let’s not forget about the versatility. You can easily customize these bars to suit your family’s preferences. Want to add some nuts for a little crunch? Go for it! Prefer a different dried fruit? The world is your oyster! These bars are a blank canvas just waiting for your creative touch.
So, if you’re looking for a quick and satisfying dessert that will please everyone in your household, look no further than these Cherry Coconut Magic Bars. They’re not just a treat; they’re a lifesaver for busy days!
Ingredients You’ll Need
Before we dive into the magic of baking, let’s gather our ingredients for these delightful Cherry Coconut Magic Bars. Trust me, you’ll love how simple and straightforward this list is! Here’s what you’ll need:
- 1 cup almond flour: This is the base of our bars, giving them a lovely nutty flavor and a gluten-free twist. If you’re not a fan of almond flour, feel free to swap it out for coconut flour, but remember to use only about 1/3 cup since it absorbs more moisture.
- 1/4 cup unsweetened cocoa powder: This adds a rich chocolatey depth to our bars. If you want to lighten things up, you could use carob powder instead for a different flavor profile.
- 1/4 cup granulated erythritol: A fantastic sugar substitute that keeps our bars low in calories. If you prefer, you can use coconut sugar or regular granulated sugar, but that will change the nutritional content.
- 1/4 cup unsalted butter, melted: This brings everything together and adds a luscious richness. If you’re looking for a dairy-free option, coconut oil works beautifully here!
- 1/2 teaspoon vanilla extract: A must-have for that warm, comforting flavor. You can also use almond extract for a different twist.
- 1/4 teaspoon salt: Just a pinch to enhance all the flavors. Don’t skip this; it’s like the secret handshake of baking!
- 1 cup unsweetened shredded coconut: This is where the magic happens! It adds texture and that tropical flair. If you’re not a coconut fan, you could use oats instead for a chewy texture.
- 1/2 cup sugar-free chocolate chips: Because who doesn’t love a little chocolate? You can use regular chocolate chips if you’re not worried about sugar content.
- 1/2 cup chopped dried cherries: These little gems add a burst of sweetness and tartness. If cherries aren’t your thing, feel free to swap them for dried cranberries or apricots!
- 2 large eggs: These help bind everything together and give our bars a nice structure. If you’re looking for an egg-free option, you can use flax eggs (1 tablespoon of ground flaxseed mixed with 2.5 tablespoons of water per egg).
And there you have it! A simple yet delightful lineup of ingredients that come together to create something truly special. If you’re like me and love having everything organized, I’ve included printable measurements at the end of this article for your convenience. Now, let’s get ready to bake some magic!
How to Make Cherry Coconut Magic Bars
Alright, my fellow busy women, it’s time to roll up our sleeves and dive into the delightful process of making these Cherry Coconut Magic Bars. Trust me, it’s as easy as pie—well, easier, actually! Let’s break it down step by step so you can whip these up in no time.
Step 1 – Prep Ingredients
First things first, let’s get that oven preheated to 350°F (175°C). This is crucial because we want our bars to bake evenly and come out perfectly golden. While that’s heating up, grab an 8×8-inch baking dish and line it with parchment paper. Make sure to leave a little overhang on the sides; this will be your lifesaver when it’s time to lift those bars out. Trust me, you’ll thank me later!
Step 2 – Begin Cooking
Now that we’re all set, it’s time to mix our dry ingredients. In a mixing bowl, combine 1 cup of almond flour, 1/4 cup of unsweetened cocoa powder, and 1/4 cup of granulated erythritol. Give it a good stir until everything is well blended. Then, pour in that melted butter, 1/2 teaspoon of vanilla extract, and a pinch of salt. Mix it all together until you have a crumbly mixture that resembles wet sand. It’s like building a sandcastle, but way tastier!
Step 3 – Combine Ingredients
Next, we’re going to press that crumbly mixture evenly into the bottom of our prepared baking dish. Use your fingers or a spatula to make sure it’s nice and compact. This will be the crust of our magic bars, so we want it to hold together well. Now, in another bowl, whisk together 2 large eggs. Once they’re frothy, add in 1 cup of unsweetened shredded coconut, 1/2 cup of sugar-free chocolate chips, and 1/2 cup of chopped dried cherries. Stir until everything is well combined. This mixture is where the magic truly happens!
Step 4 – Finish and Serve
Pour that luscious coconut mixture over the crust in the baking dish, spreading it evenly. Now, it’s time to pop it into the preheated oven! Bake for about 25-30 minutes, or until the edges are golden and the center is set. Your kitchen will start to smell heavenly, and you might find yourself doing a little happy dance while you wait.
Once they’re done, let the bars cool completely in the pan. This is important because it allows them to firm up, making them easier to cut. When they’re cool, use the parchment overhang to lift them out of the dish. Cut them into squares, and voilà! You’ve just made a batch of Cherry Coconut Magic Bars that are sure to impress.
These bars can be stored in an airtight container in the refrigerator for up to a week, but I doubt they’ll last that long! Enjoy your sweet creation, and don’t forget to share with your family—if you can bear to part with them!
Tips for Perfect Results
Now that you’re all set to make your Cherry Coconut Magic Bars, let’s talk about a few tips that will help you achieve perfect results every time. After all, we want these bars to be as magical as they sound!
First and foremost, always use fresh ingredients. Trust me, the quality of your ingredients can make a world of difference in flavor. Fresh almond flour, for instance, will give your bars a nutty richness that stale flour just can’t match. And don’t skimp on the cherries or coconut—using the freshest options will elevate your bars from good to absolutely divine!
Next, consider chilling the bars before cutting them. I know, waiting can be tough, especially when you’re eager to dive into those delicious squares. But trust me on this one! Chilling them for about an hour in the fridge will help them firm up, making it much easier to cut clean edges. You’ll end up with perfectly shaped bars that look as good as they taste. Plus, the flavors have a chance to meld together beautifully during that time!
Lastly, make sure to store your Cherry Coconut Magic Bars in an airtight container. This is key to maintaining their freshness. If you leave them exposed, they can dry out faster than you can say “magic.” I usually pop them in the fridge, where they can last up to a week. But let’s be real—if your family is anything like mine, they’ll be gone in a flash!
So, there you have it! With these simple tips, you’ll be well on your way to creating the most delightful Cherry Coconut Magic Bars that will have everyone asking for seconds. Happy baking!
Essential Equipment Needed
Before we dive into the deliciousness of Cherry Coconut Magic Bars, let’s make sure you have all the essential equipment ready to go. Trust me, having the right tools on hand can make the baking process smoother and more enjoyable. Here’s what you’ll need:
- Baking dish (8×8-inch): This is the star of the show! An 8×8-inch baking dish is perfect for our magic bars, allowing them to bake evenly and come out just the right thickness. If you don’t have one, a 9×9-inch dish will work too, but keep an eye on the baking time as they may cook a bit faster.
- Mixing bowls: You’ll need a couple of mixing bowls—one for the crust and another for the coconut filling. I recommend using glass or stainless steel bowls, as they’re easy to clean and won’t retain any odors. Plus, they look pretty while you’re mixing up your magic!
- Whisk: A good whisk is essential for combining your ingredients smoothly. Whether you’re whisking eggs or mixing dry ingredients, this handy tool will help you achieve that perfect consistency. If you don’t have a whisk, a fork will do in a pinch, but I promise you’ll love the ease of a whisk!
- Parchment paper: This is your best friend when it comes to easy cleanup! Lining your baking dish with parchment paper not only prevents sticking but also makes it a breeze to lift the bars out once they’re baked. It’s like having a built-in handle for your delicious creation!
- Spatula: A sturdy spatula is a must-have for spreading the crust and coconut filling evenly in the baking dish. It’s also great for cutting the bars once they’re cool. I recommend a silicone spatula, as it’s gentle on your baking dish and makes scraping every last bit of goodness a cinch!
With these essential tools in your kitchen arsenal, you’ll be well-equipped to whip up a batch of Cherry Coconut Magic Bars that will impress everyone. So gather your gear, and let’s get baking!
Delicious Variations of Cherry Coconut Magic Bars
Now that you’ve mastered the basic recipe for Cherry Coconut Magic Bars, let’s talk about how to take these delightful treats to the next level! The beauty of these bars lies in their versatility, and I’m here to share some delicious variations that will keep your taste buds dancing and your family coming back for more.
First up, let’s add some crunch! Chopped nuts like pecans or walnuts can bring a delightful texture to your magic bars. Just imagine biting into a chewy bar and getting that satisfying crunch from the nuts. It’s like a little surprise in every bite! You can mix in about 1/2 cup of your favorite nuts into the coconut filling or sprinkle them on top before baking. Not only do they add flavor, but they also boost the nutritional value. Win-win!
Next, if you’re a chocolate lover (and who isn’t?), consider drizzling some melted sugar-free chocolate on top of your baked bars. It’s like giving your magic bars a decadent makeover! Simply melt a handful of sugar-free chocolate chips in the microwave, then use a spoon or a piping bag to drizzle it over the cooled bars. This extra layer of chocolate not only enhances the sweetness but also makes them look oh-so-tempting. Your family will think you’re a professional baker!
And let’s not forget about the fruit! While dried cherries are a fantastic choice, you can easily switch things up by substituting them with other dried fruits like cranberries or apricots. Each fruit brings its own unique flavor profile, so feel free to experiment! Dried cranberries will add a tartness that beautifully complements the sweetness of the coconut, while apricots will lend a lovely chewy texture and a hint of tropical flavor. The possibilities are endless!
So, whether you’re in the mood for a nutty crunch, a chocolatey drizzle, or a fruity twist, these variations will keep your Cherry Coconut Magic Bars exciting and fresh. Don’t be afraid to get creative and make these bars your own. After all, baking is all about having fun and enjoying the process!
Serving Suggestions
Now that you’ve whipped up a batch of those scrumptious Cherry Coconut Magic Bars, let’s talk about how to elevate your dessert experience with some delightful serving suggestions! After all, presentation is key, and pairing these bars with the right accompaniments can turn a simple treat into a memorable moment.
First up, let’s consider the classic pairing of fresh fruit. A side of juicy strawberries, sweet blueberries, or even slices of ripe mango can add a refreshing contrast to the rich flavors of the bars. Imagine taking a bite of that chewy, coconut-infused goodness, followed by a burst of fresh fruit. It’s like a mini tropical vacation on your plate! Plus, the vibrant colors of the fruit make your dessert look even more inviting. It’s a feast for the eyes and the taste buds!
If you’re in the mood for something a bit more indulgent, why not serve your Cherry Coconut Magic Bars with a scoop of low-calorie ice cream? Vanilla or coconut-flavored ice cream would complement the bars beautifully, creating a delightful harmony of flavors. The creaminess of the ice cream paired with the chewy texture of the bars is a match made in dessert heaven. Just picture it: a warm bar topped with a cool scoop of ice cream, melting slightly as you dig in. Pure bliss!
And let’s not forget about the perfect beverage to accompany your sweet treat. A steaming cup of herbal tea or a rich cup of coffee can enhance the overall experience. The warmth of the tea or coffee contrasts beautifully with the coolness of the ice cream, creating a delightful balance. Plus, sipping on a comforting drink while enjoying your Cherry Coconut Magic Bars adds a cozy touch to your afternoon or evening. It’s like wrapping yourself in a warm blanket while savoring every bite!
So, whether you choose to pair your bars with fresh fruit, a scoop of ice cream, or a comforting beverage, these serving suggestions will take your dessert game to the next level. Enjoy every moment, and don’t forget to share the joy with your loved ones—if you can bear to part with your delicious creation!
FAQs About Cherry Coconut Magic Bars
As you embark on your journey to create these delightful Cherry Coconut Magic Bars, you might have a few questions swirling around in your mind. Don’t worry; I’ve got you covered! Here are some frequently asked questions that will help you navigate the magic of these bars with ease.
Can I make these bars ahead of time?
Absolutely! One of the best things about Cherry Coconut Magic Bars is that they can be made a few days in advance. Just whip up a batch, let them cool completely, and store them in an airtight container in the refrigerator. This way, you’ll have a sweet treat ready to go whenever those cravings hit. It’s like having a little stash of happiness waiting for you!
Are these bars gluten-free?
Yes, indeed! Using almond flour as the base for these bars makes them naturally gluten-free. So, if you or someone in your family is following a gluten-free diet, you can enjoy these magic bars without any worries. They’re a delicious way to satisfy your sweet tooth while keeping things gluten-free!
Can I freeze Cherry Coconut Magic Bars?
You bet! These bars freeze beautifully, making them a perfect option for meal prep or for when you want to have a sweet treat on hand. Just wrap them tightly in plastic wrap or aluminum foil before placing them in an airtight container. When you’re ready to enjoy, simply thaw them in the refrigerator overnight or at room temperature for a few hours. It’s like having a little piece of magic waiting for you in the freezer!
So, there you have it! With these FAQs, you’re all set to tackle any questions that may arise while making your Cherry Coconut Magic Bars. Enjoy the process, and remember, baking is all about having fun and creating something delicious to share with your loved ones!

Final Thoughts on Cherry Coconut Magic Bars
As we wrap up our delightful journey into the world of Cherry Coconut Magic Bars, I can’t help but reflect on just how easy and satisfying this recipe truly is. Seriously, it’s like a little slice of heaven that you can whip up in no time! With just a handful of simple ingredients and minimal effort, you can create a treat that not only tastes amazing but also brings a smile to your face after a long day.
These bars are more than just a dessert; they’re a testament to the fact that you can enjoy something sweet without spending hours in the kitchen. I mean, who doesn’t love a recipe that allows you to indulge while still keeping things simple? The combination of chewy coconut, sweet cherries, and a hint of chocolate is like a party for your taste buds, and the best part is that it all comes together in just 45 minutes!
So, if you’re a busy woman navigating the hustle and bustle of life, I wholeheartedly encourage you to give these Cherry Coconut Magic Bars a try. They’re perfect for satisfying those sweet cravings, whether you’re enjoying a quiet moment with a cup of tea or sharing them with family and friends. Plus, the versatility of this recipe means you can customize it to fit your family’s preferences, making it a go-to dessert for any occasion.
Whether you choose to stick with the classic recipe or experiment with your own variations, I promise you won’t be disappointed. So, roll up your sleeves, gather your ingredients, and let the magic happen in your kitchen. Trust me, once you take that first bite, you’ll be hooked! Happy baking, and may your days be filled with sweetness and joy!
“`
Print
Cherry Coconut Magic Bars: Indulge in Easy Sweetness!
- Total Time: 45 minutes
- Yield: 9 servings 1x
- Diet: Low Calorie
Description
Indulge in the delightful sweetness of Cherry Coconut Magic Bars, a perfect treat for any occasion!
Ingredients
- 1 cup almond flour
- 1/4 cup unsweetened cocoa powder
- 1/4 cup granulated erythritol
- 1/4 cup unsalted butter, melted
- 1/2 teaspoon vanilla extract
- 1/4 teaspoon salt
- 1 cup unsweetened shredded coconut
- 1/2 cup sugar-free chocolate chips
- 1/2 cup chopped dried cherries (sugar-free if possible)
- 2 large eggs
Instructions
- Preheat your oven to 350°F (175°C) and line an 8×8-inch baking dish with parchment paper, leaving some overhang for easy removal.
- In a mixing bowl, combine almond flour, cocoa powder, erythritol, melted butter, vanilla extract, and salt. Mix until well combined and crumbly.
- Press the mixture evenly into the bottom of the prepared baking dish to form the crust.
- In another bowl, whisk together the eggs. Add shredded coconut, chocolate chips, and chopped dried cherries to the eggs and stir until well mixed.
- Pour the coconut mixture over the crust in the baking dish, spreading it evenly.
- Bake in the preheated oven for 25-30 minutes, or until the edges are golden and the center is set.
- Let cool completely in the pan before lifting out using the parchment overhang.
- Cut into squares and serve. These bars can be stored in an airtight container in the refrigerator for up to a week.
Notes
- For added flavor, consider using chopped nuts like pecans or walnuts in place of some of the coconut.
- You can also drizzle melted sugar-free chocolate over the top for an extra treat.
- Serve with a side of pork rinds or cucumber slices for a crunchy contrast.
- Prep Time: 15 minutes
- Cook Time: 30 minutes
- Category: Dessert
- Method: Baking
- Cuisine: American
Nutrition
- Serving Size: 1 bar
- Calories: 180
- Sugar: 0g
- Sodium: 0mg
- Fat: 16g
- Saturated Fat: 0g
- Unsaturated Fat: 0g
- Trans Fat: 0g
- Carbohydrates: 4g
- Fiber: 0g
- Protein: 4g
- Cholesterol: 0mg
Keywords: Cherry Coconut Magic Bars, dessert, low calorie, baking
